I’m currently planning to switch my Homelab to a cluster of eight Raspberry Pi CM4 modules with two Turing Pi 2 boards. That means a full switch to the aarch64/ARM processor architecture. But not all software supports aarch64 yet. So I went looking for a small x86 machine which doesn’t cost too much, doesn’t take too much space, and doesn’t consume too much power.
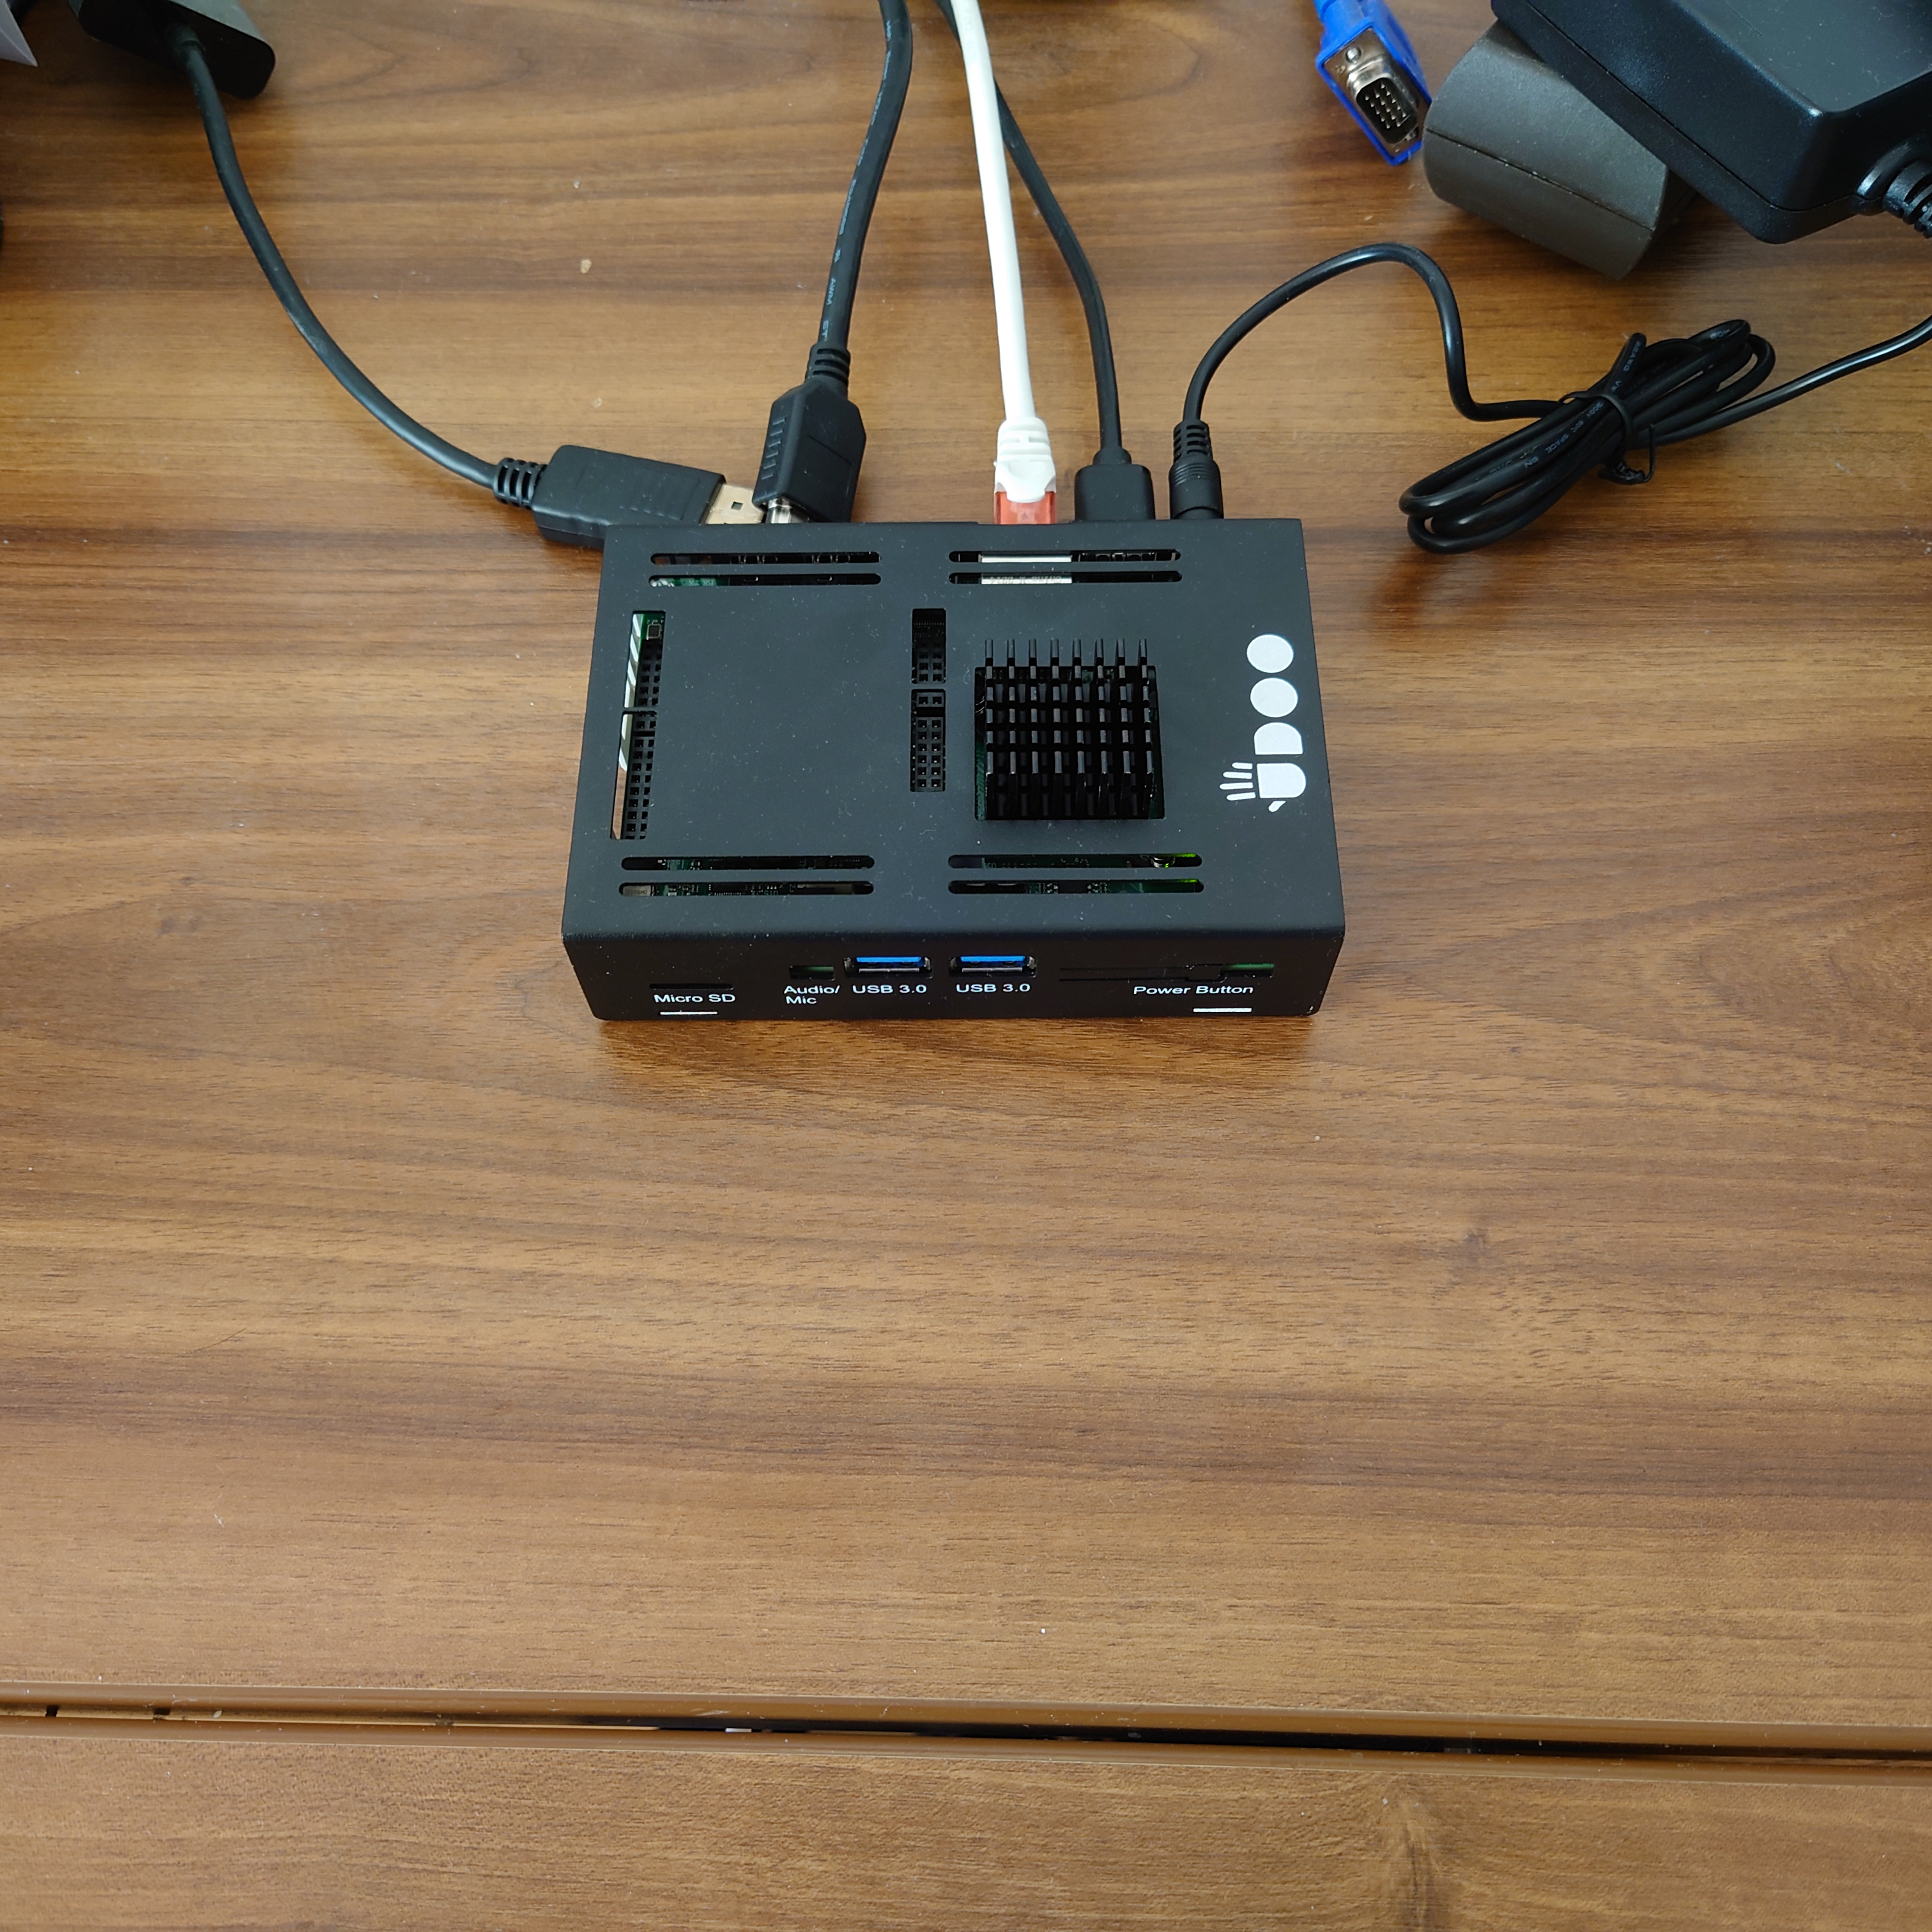
What I found was the Udoo x86 II Ultra. Here are the base specs:
- CPU: Intel Pentium N3710 2.56 GHz
- RAM: 8 GB DDR3 Dual Channel
- Storage: 32 GB eMMC
The power is more than enough, as I don’t expect to end up with too many x86 only services (right now I’m running over 20 jobs in my cluster, and none of them is x86 only).
With an enclosure and a power brick, it cost me a total of 450 €. Could I have build a cheaper machine from standard components? Possibly. But it would not have been this small (13 cm x 9 cm x 3cm) and would have probably drawn at least a bit more power. With how little it uses, it is also running perfectly when passively cooled.
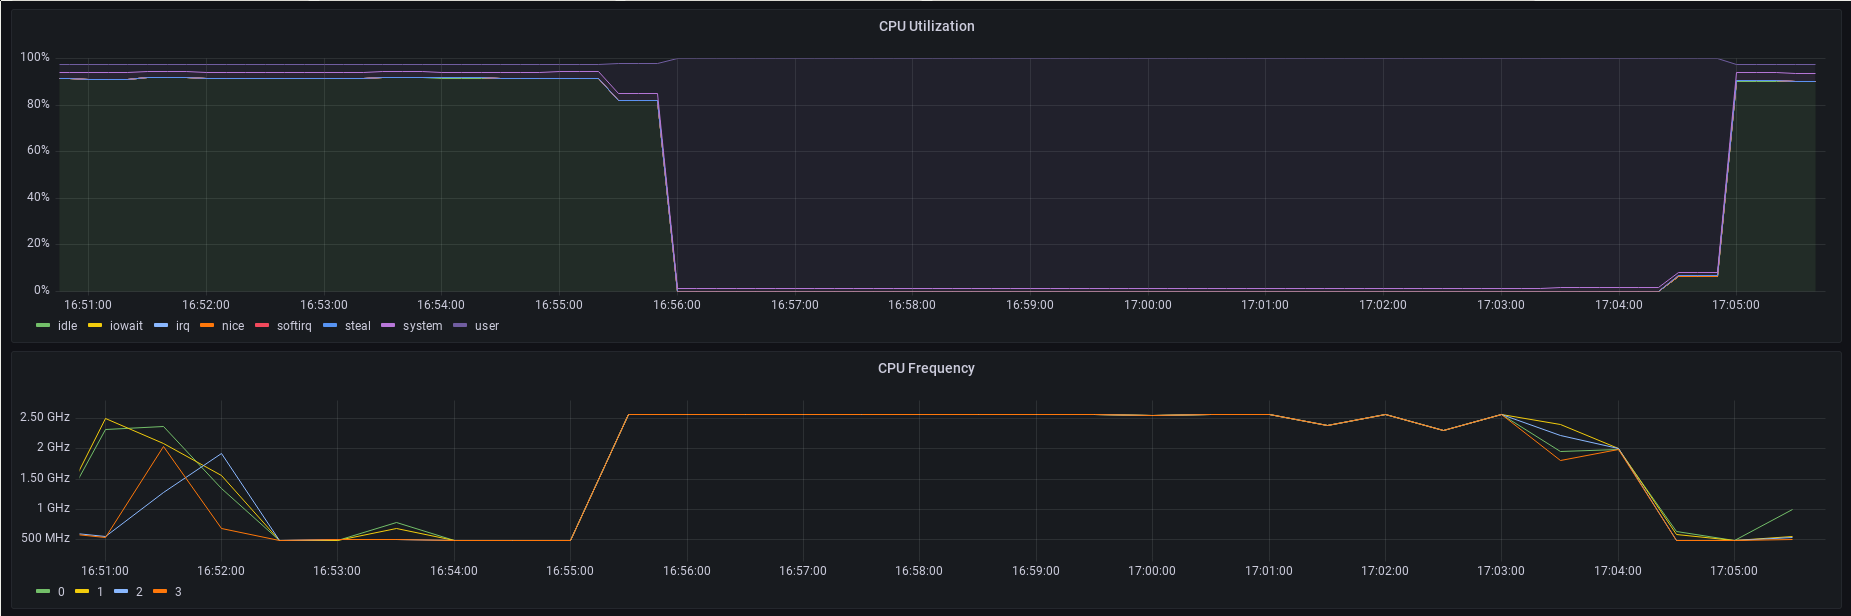
Here is a Grafana plot showing the CPU utilization and CPU frequency during
a stress-ng -c 4 run. The small heat sink in the picture above was able to
sustain the full 2.56 GHz on all four cores for about 5 minutes before throttling
started.
The storage does not play much of a role for me, as I planned to netboot it anyway. This machine’s only task is to serve as an x86 machine in my Nomad cluster for those few services I would like to run which only support x86.
In the rest of this post, I will go a little bit into details on the netboot and image creation for this machine. I only just finished a series on netbooting Raspberry Pis, but this was a different experience for two reasons: One, the Udoo supports full standard PXE boot, while the Pi does a little bit of its own thing. Two, I had to redo my image setup, because I used the packer-builder-arm Packer plugin for my Pi images. For this new image, I now used the QEMU builder, which has an amusing (to me 😉) way of running an OS installer (Ubuntu again).
PXE boot
There is one major difference between the Pi netboot approach I have described in a previous article and the standard PXE boot process.
Every PXE network boot process needs a Network Bootstrap Program. This program serves as the bootloader for the system under netboot, similar to grub in local boots. Grub itself can even be used as a Network Bootstrap Program. On Raspberry Pis, that program is already present on the Pi itself, because Pis do not follow a standard boot process and don’t have BIOS or UEFI.
So with the Udoo, we need one additional step: Downloading the Network Bootstrap Program. Once that Network Bootstrap Program is downloaded though, the boot process for Raspberry Pis and the Udoo look exactly the same.
The NBP can be a variety of different programs. In my setup, I am using Syslinux. Syslinux is part of a tandem of programs, with the other one being PXELinux. They share similar configurations and behavior, and the main difference is that Syslinux is for use with UEFI systems, while PXELinux is for use with BIOS systems.
To begin with, the network stack and netbooting needs to be enabled in the Udoo’s BIOS.
Preparing the netboot server
In addition, syslinux needs to be installed on the server providing TFTP. Once
it is installed, you need the following files in a directory where your TFTP
server can access them:
syslinux.efildlinux.e64
Where exactly those files are found depends on the distribution/package. On
Ubuntu, they are found at /usr/lib/syslinux/modules/efi64/ldlinux.e64 for the
ldlinux.e64 and at /usr/lib/SYSLINUX.EFI/efi64/syslinux.efi for the syslinux.efi.
For my configuration, I just put those files into the root of my /mnt/netboot
NFS share.
The netboot process, similar to Raspberry Pis, begins with a DHCP request. So the first step is configuring the DHCP server for netbooting. This is described in detail in my Pi netboot server article and I will only describe the additions here.
The DNSmasq config from the Pi netboot article only needs to be extended by a single line, but I will only show the file with the Syslinux options here:
port=0
dhcp-range=10.86.5.255,proxy
log-dhcp
enable-tftp
tftp-root=/mnt/netboot
pxe-service=X86-64_EFI,"EFI Netboot",syslinux.efi
The pxe-service option has, as its first parameter, the client architecture.
In this case, X86-64_EFI, because the Udoo is a x86 machine with UEFI.
The third parameter provides the NBP file which will be offered to all clients
which contact this DHCP server with the X86-64_EFI client architecture.
The filepath is relative to the tftp-root directory.
Now we are ready to prepare the configuration file. Basically the only thing the PXE protocol says is how to get this NBP file via DHCP and TFTP. Everything else is up to the NBP itself.
How Syslinux works is described in the official wiki. Don’t worry about PXELinux here, both programs do almost the same things.
In principle, it works similar to the Raspberry Pi netboot, with one difference: Instead of looking for predetermined files in predetermined directories for kernel, initrd and kernel command line, it only looks for a configuration file in multiple different places and takes all options from that.
When looking for a config file, Syslinux will be looking in the following places:
/mnt/netboot/pxelinux.cfg/<Client machine id>/mnt/netboot/pxelinux.cfg/<HWTYPE>-<HW ADDRESS>/mnt/netboot/pxelinux.cfg/<IPv4 in HEX>default
Here, the client machine id is a unique machine identifier. I have not been
able to figure out how to determine that value when booted into a machine. I had
to take it from the DNSmasq logs showing the files requested by the client.
The HWTYPE is the ARP hwtype, e.g. 01 for ethernet, with the rest being
the MAC address of the NIC.
The last possibility is the IPv4 address of the host in hex notation. The IP
address can also be provided in a partial form.
For example, a host with the IP 10.0.0.1 would use a config file at
pxelinux.cfg/0a000001, but also pxelinux.cfg/0a00. This way, different boot
configs can be provided for different subnets.
A Syslinux config file looks like this:
DEFAULT linux
LABEL linux
  KERNEL <hostname>/vmlinuz
  INITRD <hostname>/initrd.img
  APPEND boot=rbd rbdroot=10.0.0.1,10.0.0.2,10.0.0.3:clusteruser:<ceph-key>:pi-cluster:<hostname>::_netdev,noatime
These files are kept pretty simple. In my setup, the initrd and kernel image
are placed under a directory depending on the hostname, beneath the main netboot
directory configured as tftp-root in the DNSmasq config. So for example for a
host called sobek, the kernel would be placed at /mnt/netboot/sobek/vmlinuz.
The APPEND parameter contains the kernel command line parameters. So for my
Ceph RBD root device setup, that’s the necessary options for mounting a RBD
volume.
So to recap, what happens during a boot of my Udoo:
- The host requests an IP address via DHCP, answered by my main firewall
- The host requests netboot options, providing its unique client ID
- My DNSmasq answers with itself as the TFTP server and the
syslinux.efifile - The host downloads
syslinux.efivia TFTP from my DNSmasq server and loads it - Syslinux checks for configuration files on the TFTP server
- The only found config file, matching the unique client machine id of my Udoo, is loaded by Syslinux
- Syslinux loads the kernel from
hostname/vmlinuzvia TFTP - Syslinux loads
hostname/initrdvia TFTP and unpacks it
After that sequence, the Kernel and initramfs take over, and the rest of the boot follows the steps described in detail here.
Preparing an Ubuntu image for a generic machine
In my previous article I described how to create an image for a Raspberry Pi 4. To do so, a special Packer builder for ARM machines was used. This specific builder made use of the chroot command, instead of creating a full VM and it used a preinstalled Ubuntu server image for Raspberry Pis.
This time around, we’re going to be using a different Packer builder, namely the QEMU Builder. The base approach is still the same: Prepare the new machine, and then run a provisioner. The provisioner has not changed at all here. It will be Ansible again, in fact with the same playbook I used for the Pi setup previously.
The difference is how the Image is build: Instead of just downloading a preinstalled image, the QEMU builder will create a fresh disk and allow you to mount an install medium.
And then we arrive at the really funny part: It can automate the installation, even if that installation requires inputs. 😅
The Packer template file looks like this:
variable "hn_hostname" {
  type = string
  description = "Hostname for the machine which uses this image."
}

variable "hn_netboot" {
  type = bool
  description = "Should the host netboot or should it boot from a local disk?"
}

variable "hn_host_id" {
  type = string
  description = "Host ID, e.g. HW ID for Pi or DHCP client-machine-id"
}

local "foobar-pw" {
  expression = vault("secret/imhotep", "pw")
  sensitive = true
}

local "hn_ceph_key" {
  expression = vault("secret/ceph/users/picluster", "key")
  sensitive = true
}

source "qemu" "ubuntu-generic" {
  iso_url           = "https://releases.ubuntu.com/22.04.1/ubuntu-22.04.1-live-server-amd64.iso"
  iso_checksum      = "sha256:10f19c5b2b8d6db711582e0e27f5116296c34fe4b313ba45f9b201a5007056cb"
  output_directory  = "output_${var.hn_hostname}"
  shutdown_command  = "echo 'packer' | sudo -S shutdown -P now"
  disk_size         = "10G"
  cpus              = 6
  memory            = "4096"
  format            = "raw"
  accelerator       = "kvm"
  ssh_username      = "ubuntu"
  ssh_password      = "ubuntu"
  ssh_timeout       = "20m"
  vm_name           = "${var.hn_hostname}"
  net_device        = "virtio-net"
  disk_interface    = "virtio"
  ssh_handshake_attempts = 100
  http_content      = {
    "/user-data" = templatefile("${path.root}/files/ubuntu-metadata-template",{
      hn_hostname = "${var.hn_hostname}"
    })
    "/meta-data" = ""
  }
  boot_command = [
    "c",
    "<wait>",
    "linux /casper/vmlinuz<wait>",
    " autoinstall<wait>",
    " ds=nocloud-net<wait>",
    "\\;s=http://<wait>",
    "{{.HTTPIP}}<wait>",
    ":{{.HTTPPort}}/<wait>",
    " ---",
    "<enter><wait>",
    "initrd /casper/initrd<wait>",
    "<enter><wait>",
    "boot<enter><wait>"
  ]
}

build {
  sources = ["source.qemu.ubuntu-generic"]

  provisioner "ansible" {
    user = "ubuntu"
    extra_arguments = [
      "--extra-vars", "foobar_pw=${local.foobar-pw}",
      "--extra-vars", "hn_hostname=${var.hn_hostname}",
      "--extra-vars", "hn_netboot=${var.hn_netboot}",
      "--extra-vars", "hn_ceph_key=${local.hn_ceph_key}",
      "--extra-vars", "hn_host_id=${var.hn_host_id}",
      "--extra-vars", "ansible_become_password=ubuntu",
      "--become",
      "-v"
    ]
    ansible_ssh_extra_args = [
      "-o IdentitiesOnly=yes",
      " -o HostkeyAlgorithms=+ssh-rsa",
      " -o PubkeyAcceptedAlgorithms=+ssh-rsa",
    ]
    playbook_file = "${path.root}/../bootstrap-ubuntu-image.yml"
    use_sftp = true
  }
}
The QEMU builder
Let’s start with the builder part of the template:
source "qemu" "ubuntu-generic" {
  iso_url           = "https://releases.ubuntu.com/22.04.1/ubuntu-22.04.1-live-server-amd64.iso"
  iso_checksum      = "sha256:10f19c5b2b8d6db711582e0e27f5116296c34fe4b313ba45f9b201a5007056cb"
  output_directory  = "output_${var.hn_hostname}"
  shutdown_command  = "echo 'packer' | sudo -S shutdown -P now"
  disk_size         = "10G"
  cpus              = 6
  memory            = "4096"
  format            = "raw"
  accelerator       = "kvm"
  ssh_username      = "ubuntu"
  ssh_password      = "ubuntu"
  ssh_timeout       = "20m"
  vm_name           = "${var.hn_hostname}"
  net_device        = "virtio-net"
  disk_interface    = "virtio"
  ssh_handshake_attempts = 100
  http_content      = {
    "/user-data" = templatefile("${path.root}/files/ubuntu-metadata-template",{
      hn_hostname = "${var.hn_hostname}"
    })
    "/meta-data" = ""
  }
  boot_command = [
    "c",
    "<wait>",
    "linux /casper/vmlinuz<wait>",
    " autoinstall<wait>",
    " ds=nocloud-net<wait>",
    "\\;s=http://<wait>",
    "{{.HTTPIP}}<wait>",
    ":{{.HTTPPort}}/<wait>",
    " ---",
    "<enter><wait>",
    "initrd /casper/initrd<wait>",
    "<enter><wait>",
    "boot<enter><wait>"
  ]
}
The image being used here is Ubuntu’s Server 22.04 install medium. It is downloaded and mounted as a “CD-ROM” into the VM at boot. To automate the install of Ubuntu, I’m following these official instructions to do a fully automated installation that does not ask any questions.
There are several steps necessary to achieve this:
- The boot medium kernel needs to be booted with specific parameters to enable automatic install
- A cloud-init metadata file needs to be provided. This file provides answers to the questions which are normally asked interactively during an Ubuntu install
Booting is the first hurdle, namely booting into the Ubuntu installer without any manual intervention.
This is actually supported by Packer’s QEMU builder, namely in the boot_command
option:
  boot_command = [
    "c",
    "<wait>",
    "linux /casper/vmlinuz<wait>",
    " autoinstall<wait>",
    " ds=nocloud-net<wait>",
    "\\;s=http://<wait>",
    "{{.HTTPIP}}<wait>",
    ":{{.HTTPPort}}/<wait>",
    " ---",
    "<enter><wait>",
    "initrd /casper/initrd<wait>",
    "<enter><wait>",
    "boot<enter><wait>"
  ]
This is the part which amused me to no end, when I was asking myself: How will I
be able to automate the changes in the Grub entries and finally found the answer.
What happens here: Packer will capture the stdin of the booting media (this is
still the Ubuntu install disk, not the finished image) and execute the commands
given in the boot_command option.
First, Packer waits a couple of moments and then starts with the input. It does
not read the screen or anything like that. Packer will simply input the
characters given in boot_command in the order given.
If you just boot up a VM with the Ubuntu Server live disk, you will see that the
first thing appearing is the Grub boot menu. Instead of using any entry from
there, the Packer setup will just enter Grub commands to start the boot. A console
can be opened in grub by pressing c. So that’s exactly what happens here with
the very first input character: c. All of the <wait> entries just make the
system wait before the next input for about 1 second.
We’re now on the Grub command line. The next command sets the Linux kernel
grub should use. This is simply the kernel from the installer. The boot files
for the installer are automatically mounted at /casper.
Next come the Linux kernel parameters. The first one, autoinstall, makes
Ubuntu run the automatic install instead of asking the user any questions.
The next option, which ends up as ds=nocloud-net\\;s=http://{{.HTTPIP}}:{{.HTTPPort}}/
defines the location of the config file for the automatic installation.
In this case, the QEMU builder has a neat little function, where it can start an HTTP server locally, making it available to the booting VM, and serving local files from there to the VM. This server is configured in this part:
  http_content      = {
    "/user-data" = templatefile("${path.root}/files/ubuntu-metadata-template",{
      hn_hostname = "${var.hn_hostname}"
    })
    "/meta-data" = ""
  }
This defines the content served by the HTTP server. The value is a simple map
string => string. In this instance, I’m using the templatefile function.
It allows me to use a local file to serve from the HTTP server, instead of
defining the entire file to deliver in the Packer template file. Why? Because
I just don’t like pasting multiline files in other files. If possible, I like
to keep separate files actually separately.
#cloud-config
autoinstall:
  version: 1
  identity:
    hostname: "${hn_hostname}"
    password: "$6$exDY1mhS4KUYCE/2$zmn9ToZwTKLhCw.b4/b.ZRTIZM30JZ4QrOQ2aOXJ8yk96xpcCof0kxKwuX1kqLG/ygbJ1f8wxED22bTL4F46P0"
    username: ubuntu
  locale: en_US.UTF-8
  storage:
    layout:
      name: direct
  ssh:
    install-server: true
  late-commands:
    - echo 'ubuntu ALL=(ALL) NOPASSWD:ALL' > /target/etc/sudoers.d/sysuser
The potential content of this file is described in the Ubuntu docs.
One important thing to note: The comment #cloud-config at the beginning is
actually mandatory.
The password is the password for the initial user, which I have just called
ubuntu. The password is actually also ubuntu here, just already hashed for
direct input into the passwd file.
For the storage definition, I did not want to do anything too complicated, so
I just went with default. This default config gives you pretty much what you
would expect: A couple of hundred MB as the /boot partition, and the rest of
the disk formatted as ext4 as the root disk.
In addition, the install-server directive will install an SSH server.
Finally, highly important: Do not forget the last command under late-command.
This entry adds the newly created ubuntu user as a sudoer. This is especially
important to remember when, like me, you are coming from using a preinstalled
Raspberry Pi Ubuntu image. In those images, the ubuntu user is already
installed and it is automatically added as a sudoer. Here, we need to do that
manually.
After the kernel command line is defined, the initrd is configured, again
just to the standard initrd. Finally, the boot command is entered, which makes
grub take the previously entered configuration and try to boot it.
Here was where I hit the next couple of problems. I saw a kernel panic at the
bottom of the boot output. Something about unable to start init. This indicates
that everything might be fine with the kernel, but something went wrong with
unpacking the initramfs. But I could not see anything more. For some reason,
the system did not react to my attempts at scrolling up, and the VM was launching
in a very low resolution - there was not very much of the console output visible.
Solving this again lead me into an area of Linux I had had no reason to explore in the past: Grub arguments and commands.
Before being able to fix the actual no working init problem, I need to see
whether there are some other indications about what went wrong with the initramfs.
To do so, we can use the grub config option gfxpayload. This option can be
set either in the Grub config (which you can access in grub itself when pressing e)
or it can be entered in the Grub console, after pressing c.
The potential values for that option can be seen by entering the Grub
console with c and entering vbeinfo.
One example which should work for most modern machines is gfxpayload=1024x728x8.
After that, I was finally able to see the real problem: I was seeing I/O errors
when the system tries to unpack the initramfs. First, I thought that was because
I was working on a NFS as my working directory. But then I took a look at the
/casper directory on the Ubuntu disk. This directory actually contains a lot
of squashfs files for different host architectures and setups. And squashfs are
not very small. Then it hit me: I had only configured about 1024 MB RAM for the
VM. And the initramfs is always placed in a ramdisk. So I was simply running out
of RAM when the VM was trying to unpack the initramfs.
Once I increased the VM RAM to 4096 MB the problem disappeared and the boot/install went through without a problem.
Provisioning with Ansible
The provisioning part is similar to the previous provisioning for the Pis, described here. I’m using Ansible.
In contrast to the Pi image, the provisioning here is happening against a fully running QEMU VM. The provisioner part of the Packer file looks like this:
build {
  sources = ["source.qemu.ubuntu-generic"]

  provisioner "ansible" {
    user = "ubuntu"
    extra_arguments = [
      "--extra-vars", "foobar_pw=${local.foobar-pw}",
      "--extra-vars", "hn_hostname=${var.hn_hostname}",
      "--extra-vars", "hn_netboot=${var.hn_netboot}",
      "--extra-vars", "hn_ceph_key=${local.hn_ceph_key}",
      "--extra-vars", "hn_host_id=${var.hn_host_id}",
      "--extra-vars", "ansible_become_password=ubuntu",
      "--become",
      "-v"
    ]
    ansible_ssh_extra_args = [
      "-o IdentitiesOnly=yes",
      " -o HostkeyAlgorithms=+ssh-rsa",
      " -o PubkeyAcceptedAlgorithms=+ssh-rsa",
    ]
    playbook_file = "${path.root}/../bootstrap-ubuntu-image.yml"
    use_sftp = true
  }
}
There were several problems when I was launching the provisioning. First of all,
a good tip for debugging provisioner problems: Add the command line switch
-on-error=ask to your Packer invocation. This means that after the build step,
if the provisioning step
fails, Packer will not stop and remove all files. Instead, you will be asked what
to do. One option is to repeat the provisioning step. This even reloads the
Ansible playbook, so you can try out multiple changes in your playbook, without
having to wait for the full Ubuntu installation again.
The first problem I hit was that any file transfer, e.g. use of the copy module,
did not work at all. The only thing working was the raw module, because that
is not actually a Python module that needs to be copied, but just runs the
command given.
I must admit that I still do not know what the actual problem was. In the end,
I just had to add the option use_sftp. This makes use of SFTP for copying
files instead of SCP.
Another hurdle was the deprecation of the ssh-rsa algorithm from OpenSSH
recently. Quite frankly, I don’t know what is creating the problem here.
Both, on Ubuntu and on the machine I was executing Packer on, OpenSSH is
very current. The only thing I can imagine: The QEMU builder says that it uses
a SSH proxy to connect the local host with the VM. It’s possible that this SSH
proxy does not support the new algorithm yet. Or the problem might simply be
the SSH key generated by the QEMU builder. I did not dig too deep into this
problem and just added the -o HostKeyAlgorithms=+ssh-rsa and
-o PubkeyAcceptedAlgorithms=+ssh-rsa options to the extra Ansible SSH args.
And that’s it. Now the only thing remaining is the deployment. For that, I
execute the Packer build. Then, I take the resulting image and put it onto a
newly created 50 GB Ceph RBD volume. In addition, I’ve got a small playbook
which generates the necessary Syslinux configuration and puts it onto my
netboot server, together with the Kernel and initramfs from /boot.
Now I just need to boot the Udoo et voila, I’ve got a fully
diskless Udoo with Ubuntu Server running, with my internal Ansible user already
created and ready for the execution of my full deployment playbook.
As mentioned in the introduction, the Udoo serves as a Nomad cluster node. It is doing its job pretty well and has not made any problems in the about 10 days I have had it deployed.