I wanted to have Single Sign-On (SSO) for as many of my services as possible for quite a while. One of the main triggers was the need for 2FA, in particular for the services accessible externally, to improve general security of my Homelab setup.
SSO means that a user only logs in once, and with a single username/password combo, and then gets access to multiple different services with that login. The implementation is based first on OAuth2. This is a HTTP based protocol which facilitates authorization between multiple entities:
- The resource owner: That’s you, the user
- The client: This might be a website, smartphone app, etc
- The resource server: This is the application which has the resources you want to access
- The authorization server: This is the application which grants access
To be entirely honest, I’m probably not the right guy to explain this all in detail, as I’m not sure I actually understand all of it. 🤷
But let me try to give you an example of where I’ve previously come into contact with OAuth: Using the Drone CI server together with Gitea. I don’t want to go into details about the setup, but: Drone CI itself does not have user management. It has completely outsourced that to Gitea. When using Drone CI, you never create a Drone CI account.
Instead, you have to enable OAuth support in your Gitea instance. Gitea will serve as both, the resource server and the authorization server in the OAuth flows, while Drone CI will be the client. To enable Drone CI to talk to Gitea’s API and access it’s resources, namely the Git repositories stored on the instance, you first have to create client credentials. These credentials are user specific and consist of a client ID and a Client secret. Whenever you login to Drone, you are redirected to Gitea to authenticate, and then redirected back to Drone CI. Drone CI then uses the token it received from Gitea to show your repositories.
But OAuth2 only provides for authorization - meaning it allows a client access to resources, but it doesn’t have anything to do with authentication - which is the process of demonstrating that a user is who they claim to be. That Gitea, in the example above, required a login is only a specialty of Gitea before it hands out a secure token.
So for authentication, the OpenID Connect (OIDC) protocol has been developed. Under the hood, it makes use of OAuth2, but it allows for authentication. It does so through an “OIDC Identity Provider”. This Identity Provider (IdP) is who authenticates you.
So when you log into an app with OIDC, that app forwards you to the IdP, which will then make sure that you are really who you claim to be, e.g. with a username/password. Then, the IdP creates a JWT (JSON Web Token) and sends your browser back to the client with that JWT. Encoded in that JWT can be several pieces of information, like your username and email. The client then checks the signature on that JWT, and if it fits the IdP’s signature, it will trust the information in that JWT and log you in.
As a side node, there is at least one more protocol I know about which can be used for SSO: SAML. But OIDC is better supported at this point, so it is what I chose.
The identity provider
The heart of an SSO setup is the Identity Provider, the service which allows you to prove that you are you.
There are a number of implementations of the IdP spec. Most interesting are probably the Open Source variants, like Authentik, Keycloak or HashiCorp Vault. But there are also a large number of SaaS offerings. They get hacked from time to time.
For myself, the decision was mostly between Authentik and Keycloak. I also considered Vault for a while, as I’ve already got a Vault cluster up and running anyway. But I didn’t feel comfortable with having my main secrets store accessible on the public internet. See below for more details on Vault as an OIDC provider.
So then there’s only Authentik vs Keycloak left. And here I finally went with the good old “Argument from authority”. Keycloak is developed and used/sold by Red Hat. I’ve got a relatively high level of trust in Red Hat. Not so for Authentik. Don’t get me wrong, they are most likely fine - but nobody ever got fired for buying/deploying IBM, right? 😉
Deploying Keycloak
I deployed Keycloak as a Nomad job in my cluster, and put it behind my Traefik proxy.
The job file looks like this:
job "keycloak" {
  datacenters = ["mydatacenter"]

  priority = 70

  constraint {
    attribute = "${node.class}"
    value     = "internal"
  }

  group "keycloak" {

    network {
      mode = "bridge"
      port "health" {
        host_network = "local"
        to           = 8080
      }
    }

    service {
      name = "keycloak"
      port = 8080

      connect {
        sidecar_service {
          proxy {
            upstreams {
              destination_name = "postgres"
              local_bind_port = 5577
            }
          }
        }
      }

      tags = [
        "traefik.enable=true",
        "traefik.consulcatalog.connect=true",
        "traefik.http.routers.keycloak-internal.entrypoints=myentry",
        "traefik.http.routers.keycloak-internal.rule=Host(`login.example.com`)",
        "traefik.http.routers.keycloak-external.entrypoints=myexternalentry",
        "traefik.http.routers.keycloak-external.rule=Host(`login.example.com`) && PathPrefix(`/js/`,`/realms/myrealm/`,`/resources/`,`/robots.txt`)",
      ]

      check {
        type     = "http"
        interval = "30s"
        path     = "/health/ready"
        timeout  = "2s"
        port     = "health"
      }
    }

    task "keycloak" {
      driver = "docker"

      config {
        image = "quay.io/keycloak/keycloak:21.0.2"
        command = "start"
      }

      vault {
        policies = ["keycloak"]
      }

      env {
        KC_DB = "postgres"
        KC_DB_URL_DATABASE = "keycloak"
        KC_HOSTNAME = "login.example.com"
        KC_HOSTNAME_STRICT_BACKCHANNEL = "true"
        KC_PROXY = "edge"
        KC_HEALTH_ENABLED = "true"
        KC_LOG_CONSOLE_OUTPUT = "json"
      }

      template {
        data = <<EOH
KEYCLOAK_ADMIN="{{with secret "foobar/admin"}}{{.Data.user}}{{end}}"
KEYCLOAK_ADMIN_PASSWORD={{with secret "foobar/admin"}}{{.Data.secret | toJSON}}{{end}}
KC_DB_USERNAME="{{with secret "foobar/db"}}{{.Data.user}}{{end}}"
KC_DB_PASSWORD={{with secret "foobar/db"}}{{.Data.pw | toJSON}}{{end}}
KC_DB_URL_HOST={{env "NOMAD_UPSTREAM_IP_postgres"}}
KC_DB_URL_PORT={{env "NOMAD_UPSTREAM_PORT_postgres"}}
EOH
        change_mode = "restart"
        env = true
        destination = "secrets/file.env"
      }

      resources {
        cpu = 400
        memory = 800
      }
    }
  }
}
I’ve obfuscated it a little bit. At this point, perhaps a small hint to those who are currently typing “security through obscurity doesn’t work!!!” into their keyboards - you’re entirely right. It doesn’t. If it’s your only layer of security. You know what does work? Multi-layered security.
But onward with the job file: The constraint at the beginning isn’t too interesting - it just tells Nomad to schedule the job on an internal Node, instead of a DMZ node.
The networking is configured in bridge mode, as I’m using Consul Connect for
this job. If you want to read a bit more about Consul Connect and what it does,
you can have a look at this article
I wrote recently about a Consul bug I encountered. It contains a section about
what Consul Connect does.
The service definition has Nomad register a service called keycloak in the
Consul service registry. It also defines my Postgres service, which also runs
as a Nomad job, as an upstream, as Keycloak requires a database to work.
The tags for the service are used to configure the Traefik router for Keycloak:
tags = [
  "traefik.enable=true",
  "traefik.consulcatalog.connect=true",
  "traefik.http.routers.keycloak-internal.entrypoints=myentry",
  "traefik.http.routers.keycloak-internal.rule=Host(`login.example.com`)",
  "traefik.http.routers.keycloak-external.entrypoints=myexternalentry",
  "traefik.http.routers.keycloak-external.rule=Host(`login.example.com`) && PathPrefix(`/js/`,`/realms/myrealm/`,`/resources/`,`/robots.txt`)",
]
While the first router, keycloak-internal, is pretty mundane, the external
route is more interesting. For additional security, I’m restricting some paths.
Notably, only the myrealm realm is accessible externally. This excludes access
to the default admin realm. I’ve also thought about introducing
an extra realm, just for external access, but finally decided against it.
The health check is not too special, besides the fact that it needs to be enabled
manually by setting the environment variable KC_HEALTH_ENABLED to true.
Then let’s look at the really weird part of Keycloak’s setup. As you can see,
I’m not using the default Keycloak Docker container’s command, but instead
specify start as the command to be run in the container.
The Keycloak docs recommend
building a special Docker image, with all the environment variables already
specified in the image, and then running the container’s build command.
This is a weird way of running an app in a container, right? But it also works
perfectly fine this way, with the environment variables specified during
container startup and executing the start command.
Of note in the env vars is the KC_PROXY variable. It tells Keycloak a bit
about the HTTP entry path, so whether it is running behind a proxy or not. This
is important because Keycloak has to generate a number of URLs during normal
operation, and it needs to know how external apps can reach it.
My config of KC_PROXY=edge tells Keycloak that it is running behind a proxy
and that the proxy will be terminating HTTPS and communicate with Keycloak via
HTTP. The communication between Traefik and Keycloak is secured by the Consul
Connect mesh connecting the two services.
What disappointed me a bit was the resource requirement. I was only able to run it stably with 800 MB of memory assigned. Which seems a lot for a service which, most of the day, doesn’t do very much. Okay, it’s a Java application, but still, the consumption seems pretty high. Perhaps I will go the nostalgia route someday and dig out my notes from when I did a deep dive into Java’s Garbage Collector while writing my Bachelor’s thesis. 🙂
Setup
Once you log in with the admin account for the first time, only one realm will exist, the master realm. This realm should not be used for any actual users, and stay restricted to your admin account. The first step is now to create a fresh realm.
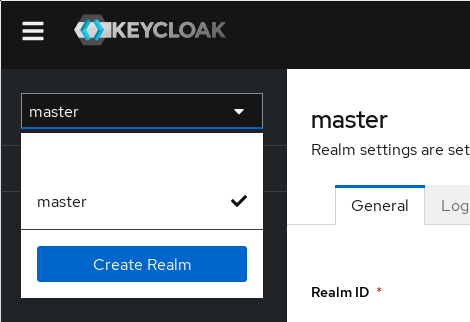
The realm chooser with the Create Realm button
The new realm page doesn’t have many options, mainly the Realm name field is of importance here. I have not used it myself, but the Resource file box can be used to import a realm previously exported.
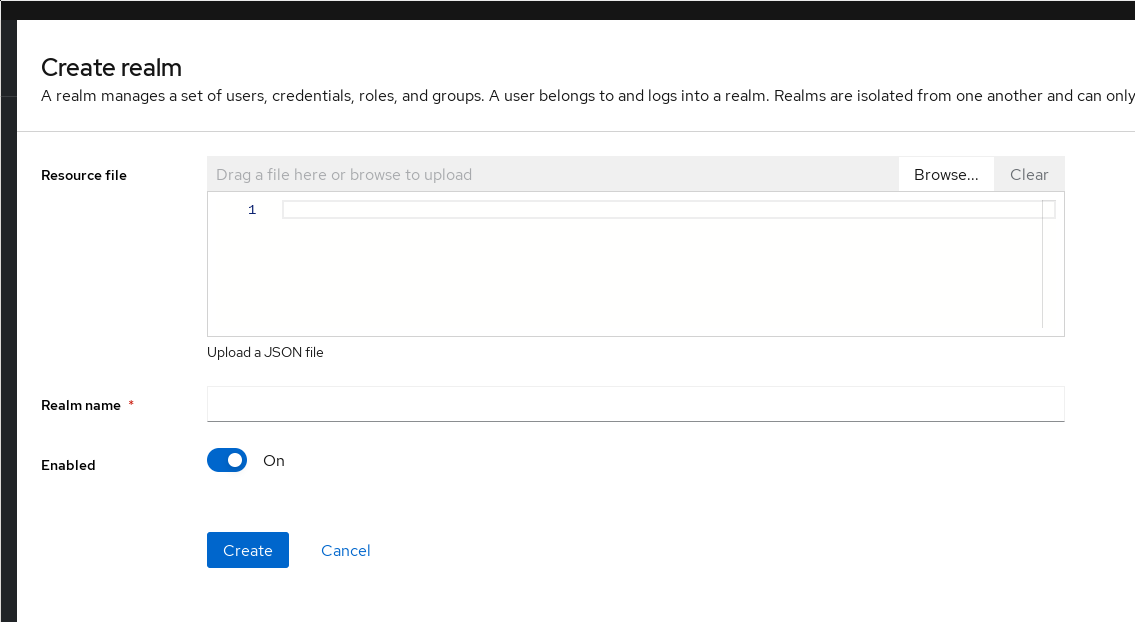
The realm creation page
Once you created a realm, make sure you chose it in the drop down at the top left, and make sure to always have the right realm selected when creating users or clients.
Keycloak’s realms are the main container for users, groups and clients. They
all get their URL under Keycloak’s realms URL. When we create a blog realm,
it will have all of its endpoints under https://login.example.com/realms/blog.
This is important to remember, as most applications only allow the configuration
of one OIDC provider URL, so any specific service can only ever use a single
realm.
Once the creation is done, the next step is looking at the Realm settings.
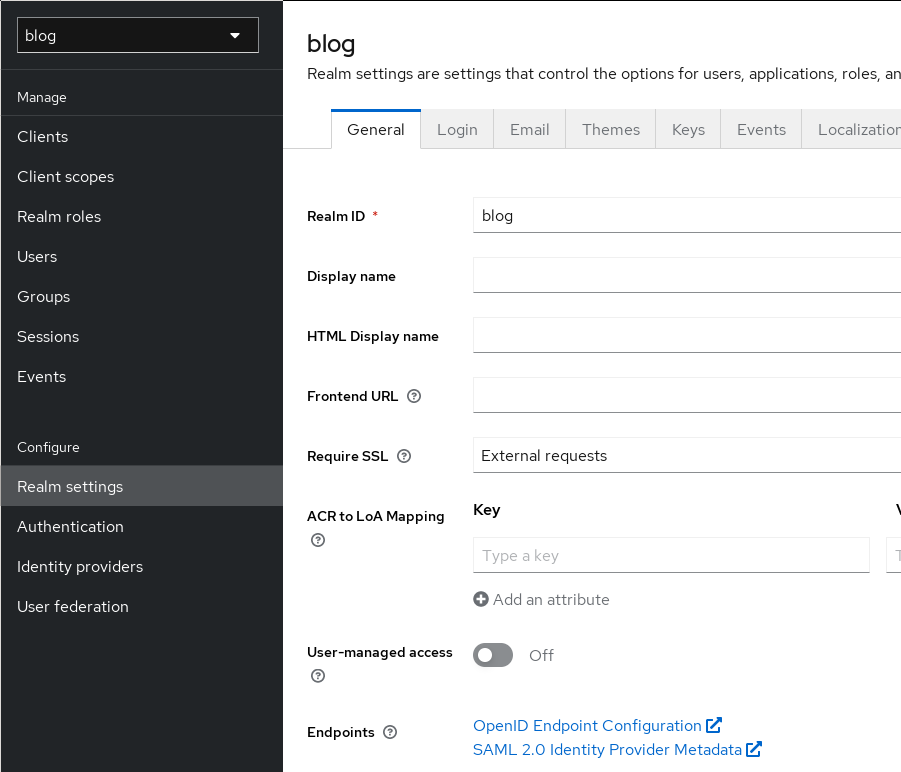
The realm settings page
Note the Endpoints links at the bottom. When you click them, you will be
redirected to the .well-known/openid-configuration URL for the realm.
This shows you all the configuration of the OIDC endpoint this realm provides.
A lot of the apps I configured for OIDC use later were able to directly use
this well-known config, instead of needing all of those options entered
manually.
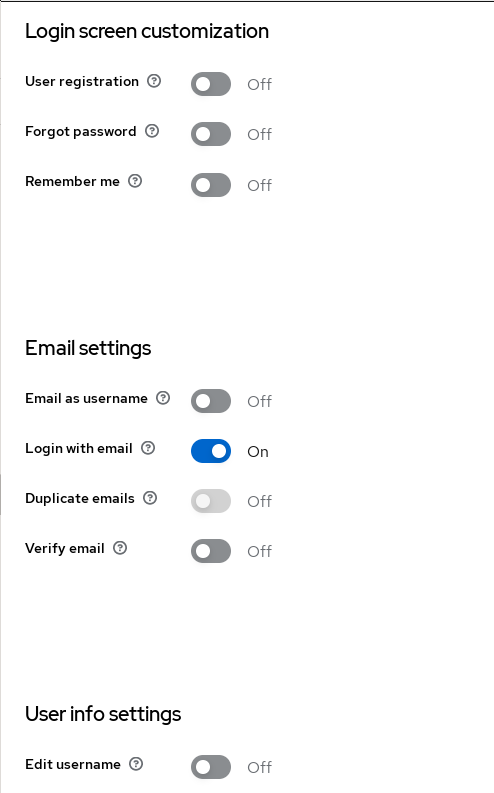
The realm settings page
For me, the most important options to set here is to switch off the
‘User registration’ and the ‘Edit username’ feature. I’m disabling the latter so
that I can use the preferred_username JWT token claim later to set the username
in apps when configuring them.
Another configuration is for sending mails, which can be configured on the Email
tab.
Finally, the Sessions tab allows configuration of idle timeouts and other TTL settings for sessions.
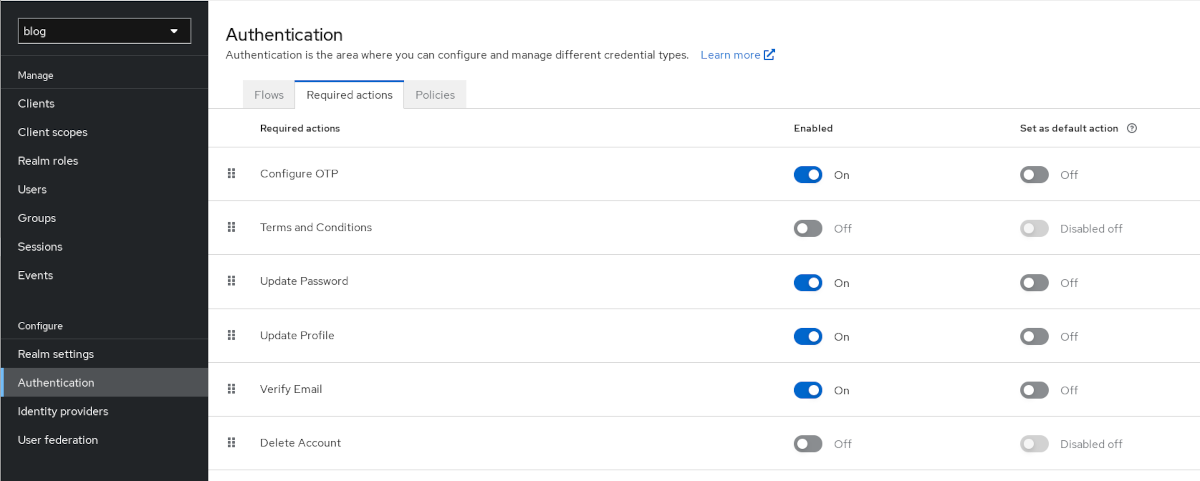
The realm authentication settings page
The realm authentication settings are the last config for realms. In the Required actions tab, you can define actions required for any new user before they can use Keycloak. For example, setting the Update Password toggle to “On” will allow admins to force a specific newly created user to have to change their password after first login. Also enabling Set as default action will automatically enable that requirement for all new users by default.
In my Homelab realm, I force all users to setup OTP and to update their password.
2FA configuration
One of the major reasons for this entire endeavour was my wish to have 2FA, at least for public services. And when using Keycloak for user authentication, that’s pretty easy to setup.
In my quest of not relying too much on a single company, I’m using FreeOTP. It’s also a Red Hat product - but hey, it’s open source and not by Google. 😉
For 2FA, Keycloak supports TOTP, Time-Based One-Time Password. It’s an open standard The way it works is that the server (Keycloak in our case) and the client app exchange a seed. This seed is then used for a RNG based on the current time. It will display a sequence of numbers, which is then typed into the authentication filed during Keycloak login.
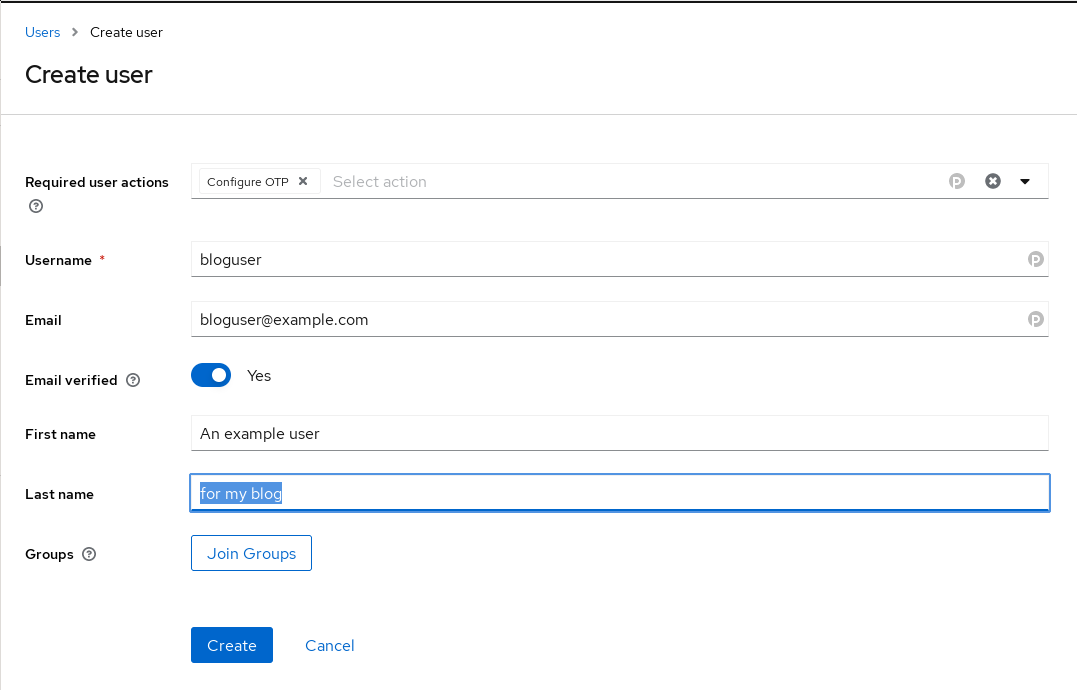
The realm user creation page
When creating a new user, the user can be forced to configure OTP via the
Required user actions field. In this case, that is not strictly necessary, as
I had already configured OTP setup to be a default required user action.
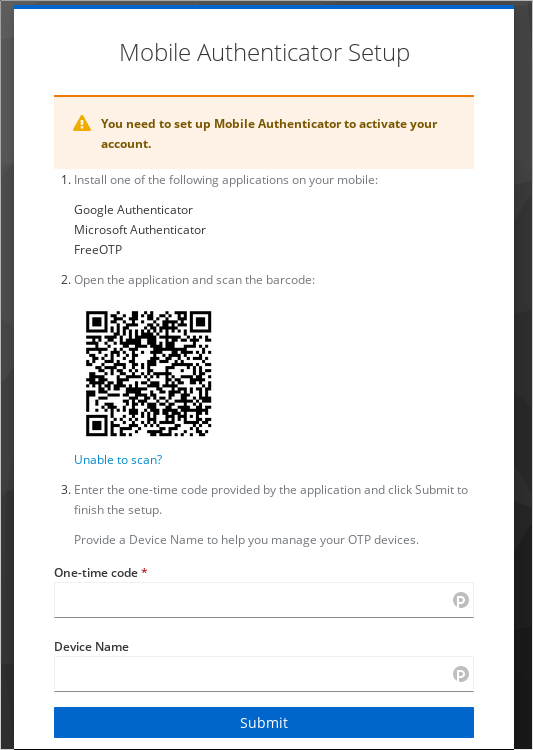
The authenticator setup page of keycloak.
Scanning the provided barcode works without problem, and now, whenever I log in, Keycloak will also request a TOTP code.
Apps
After the OIDC provider is now setup, we can set up the applications.
This is done in two phases. First, we need to create a client in the Keycloak realm we would like the application to use. This is done in the realm’s client menu. First, we need to decide on a type, between the two that Keycloak supports:
- OIDC (what we will use)
- SAML (an older protocol)
Then we need to provide a client ID and a name. The client ID will be important later as part of the client side config, but the name is only metadata and can be chosen freely.
On the next page, Capability config, it is important to enable Client authentication and make sure Standard flow is on.
The final client config page configures the domain and URLs of the client. These are the URLs that Keycloak will accept for this particular client. They have the following meaning:
- Root URL: The root URL for the app, for example
https://app.example.com - Home URL: This URL is used wherever Keycloak needs to link to the client.
Normally also just the root URL, e.g.
https://app.example.com - Valid redirect URIs: This is a security measure. Here you can define to
which URL a client’s auth request is allowed to link
back to. Each client auth request for a user will
contain a redirect link. With this option, Keycloak
will determine whether the provided URL is legitimate.
Otherwise, it will not allow authentication. This is
to prevent a site to redirect the auth request, which
will have the access token attached, to a malicious
site. An example would be
https://app.exmaple.com/*to allow any redirect to the root URL of the client. - Valid post logout redirect URIs These work in the same way as the valid redirect URIs, but for the post-logout redirect
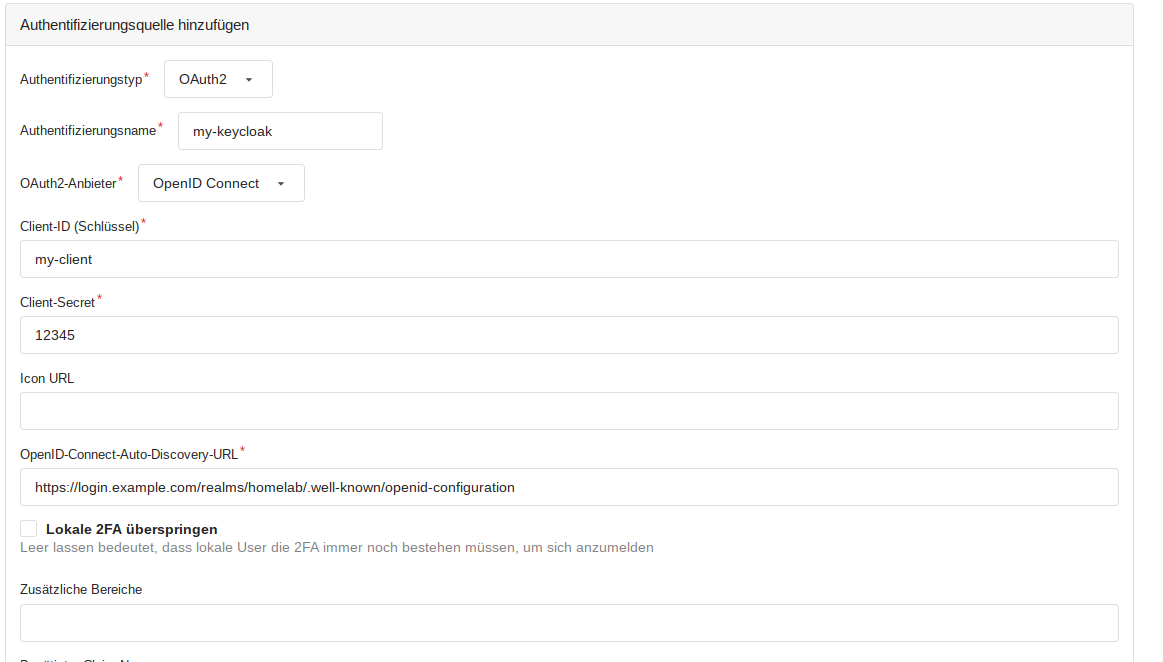
Once all of that’s done, we can configure the application itself to work with Keycloak. How that’s done depends on the app. But for any app, we need to note down the client ID we configured in the beginning, as well as the realm URL and the client secret which Keycloak automatically generates for each client. This secret can be found in the client’s realm config page, on the Credentials tab.
Another useful piece of information is the .well-known URL for the realm.
It can be found under the menu point Realm settings at the very bottom, behind
the OpenID Endpoint Configuration option. It generally has the format
https://login.example.com/realms/<REALM_NAME>/.well-known/openid-configuration.
Some apps allow you to set this URL, and the app will use the JSON document
hosted there to get all of the URLs it needs. Other apps don’t have this
functionality and need you to go to that JSON document yourself and copy the
values from there into the app config.
Now without further ado, let’s get into the application configs.
Nextcloud
Let’s start with the worst experience I had during all of this. Nextcloud. Nextcloud does support SSO with OpenID, but via an “App”, not natively. But at least the app is coming directly from Nextcloud.
There were a couple of problems when introducing OIDC into an existing setup. Make sure to read this entire section before proceeding!
I used this article as a reference for my setup.
The first step is to create the Nextcloud OIDC client, as described above. Then, in Nextcloud, install the OpenID Connect user backend app in your Nextcloud. Then, go to the app’s configuration page in Nextcloud’s admin settings.
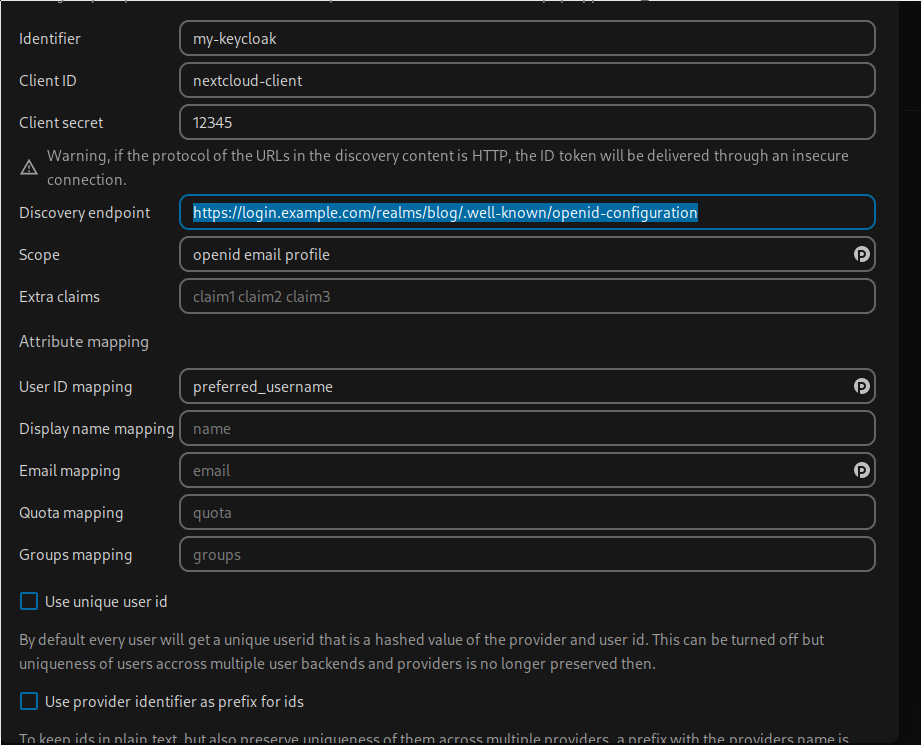
The Nextcloud oidc_user config page.
The correct link for the “Discovery endpoint” can be found on the Keycloak realm’s “Realm settings” page, at the very bottom. The client ID is set during creation of the client in Keycloak, and the “Client secret” can be found on the “Credentials” tab of the client config in Keycloak.
The Scope setting describes the kind of information that Nextcloud will request from Keycloak as part of the JWT token. “openid” is always required when using OIDC for auth.
Of importance here is the “User ID mapping”. By default, this mapping is set to “sub”. Sub is, at least in the case of Keycloak, a UUID for a user. So it’s going to be a string of numbers and letters. None too useful in my opinion. But Keycloak provides another option - the “preferred_username”. This is the username provided when a user is created in Keycloak. To make sure that no impersonation can happen, the option to change usernames can be disabled in Keycloak. Finally, make sure not to check “Use unique user id”. This would create a username by creating a hash over the “Identifier” and “sub” as delivered by Keycloak.
The above config works in my Nextcloud instance. But what did not work for me: Adopting an existing user did not seem to work. I was getting error messages when trying to log in via Keycloak that it could not create the user - which makes sense, as the user already existed.
So did I do the sensible thing an skip Nextcloud for SSO? No, of course not. Instead, I spend a weekend nuking my Nextcloud instance and setting it up new again.
Setting up Nextcloud is not the topic here, but still allow me to say: It went surprisingly fast. I just synced all the content on a disk, exported contacts and calendar, and then I nuked everything. While at it, I also switched from local storage to S3 as Nextcloud’s primary storage.
After recreating the instance and creating the new user by logging in with Keycloak for the first time, everything worked as expected.
Grafana
Grafana’s setup was way simpler than Nextcloud’s - I was able to just adopt my already existing user. This seems to have been done by checking the email and username of existing users when logging in with Keycloak.
I worked off of this official Grafana Guide
The most important thing to note here is that the description of the Keycloak config is a bit outdated.
The “Base URL” is now the “Home URL”. Under the “Client scopes” tab of the Keycloak client config, we also have to add “offline_access” as default.
And that’s it already. There is a bit more in the guide, if you would also like to administer Grafana groups with Keycloak, but I did not try that, as there’s currently only one user - me. 😄
Gitea
Gitea, like Grafana, allows adopting an existing user. Interestingly, it is not able to configure OIDC SSO in the config file, but only via the admin web interface.
The Gitea config page for authentication methods.
Mastodon
And last but not least, Mastodon also supports OIDC, and also happily adopts existing users. Sadly, I wasn’t able to find any good guide on how to config Mastodon, so I went with a couple of examples I saw in GitHub issues like this one.
Mastodon uses this third-party library to provide OIDC support.
For the Keycloak client setup, nothing special is needed. All URLs can just be
set to the root URL of your Mastodon instance, e.g. https://social.example.com/.
The Mastodon config itself is done via environment variables. One note here: If you are running Mastodon in containers, the environment variables only need to be defined for your “web” container.
I set the following variables in my config:
OIDC_CLIENT_ID=my-mastodon-keycloak-client
OIDC_CLIENT_SECRET=12345
OIDC_ENABLED = true
OMNIAUTH_ONLY = true
OIDC_DISPLAY_NAME = "Login with Keycloak"
OIDC_ISSUER = "https://login.example.com/realms/blog"
OIDC_DISCOVERY = true
OIDC_SCOPE = "openid,profile,email"
OIDC_UID_FIELD = "preferred_username"
OIDC_REDIRECT_URI = "https://social.example.com/auth/auth/openid_connect/callback"
OIDC_SECURITY_ASSUME_EMAIL_IS_VERIFIED = true
OIDC_END_SESSION_ENDPOINT = "https://login.example.com/realms/blog/protocol/openid-connect/logout"
Most of these options should be self-explanatory. The OIDC_ISSUER is the URL
to the realm in Keycloak. When OIDC_DISCOVERY is set to true, Mastodon will
automatically use the .well-known URL to get all the necessary info.
The OIDC_UID_FIELD allows you to chose where the username is coming from
in the JWT token send by Keycloak.
The OMNIAUTH_ONLY setting allows you to define that logins are only possible
via OIDC and nothing else. This disables local logins completely.
Final words and alternatives
All in all, the configuration went pretty well, if we ignore Nextcloud for a bit.
One problem with introducing SSO is that support is by far not universal. For example, for Open Core apps, SSO is generally seen as an Enterprise-only option, put behind the big 100k per year per user subscription. In other cases, supporting SSO is just not a high priority. For these cases, there is the possibility to use something like Traefik forward auth. Funky Penguin has a nice write-up, but I haven’t gotten around to trying it yet.
One big downside I encountered with Keycloak: You cannot set fine-grained permissions per client. What I mostly wanted was: Only allowing certain users to auth to certain clients. This functionality is completely missing. Once a user is a member of a realm, they can access any client, unless the client itself does some checking. Which few of them do. This has been a problem recently, even. I wanted to offer access to some of my self-hosted apps to friends, Nextcloud among them. But Nextcloud runs on my own realm. So I would have to provide them access to all apps using SSO. It’s not too bad in this case, as these were close friends and I trust them, but in a more general use case, this seems like a pretty oversight.
Finally, I also wanted to talk about why I decided against using Vault as my OIDC provider, considering that I already have it set up. The problem: I’m using it for all of my Homelab related secrets. Everything that needs to be used in an automated way comes from Vault, most importantly the secrets for all of my Nomad jobs. And after some consideration, I decided that I didn’t want to mix the two things, namely user auth and Homelab secrets. Two reasons for that: First, I might conceivably have additional users someday. That would make security one level more difficult, by having admin level access to the lab and services access to services run in that lab mixed up. Second, I want to secure public facing services - so my IdP also needs to be accessible publicly. And I really don’t want my secrets store to hang on the open internet.
Sure, I could do things like allowing my external proxy to only forward certain URLs to the Vault cluster. But honestly: I prefer there to be exactly zero paths from the public Internet to the listening sockets of my secrets store.
One big advantage Vault has over Keycloak though: It supports fine-grained permissions per user per client, so users can’t connect to a client just because they are members of the same realm as said client.
You might also have realized that in the Apps section, I did not mention a single infrastructure app, e.g. Vault, Consul or Nomad. This was on purpose, as I did not want to have my public Identity Provider to be able to grant access to admin level apps. But I am considering setting up Vault OIDC specifically for apps like Consul, Vault and Nomad. I will just first have to make really sure that I’ve got an escape hatch ready. 😅