I’ve finally made my decision and bought a server rack. The main reason is this:
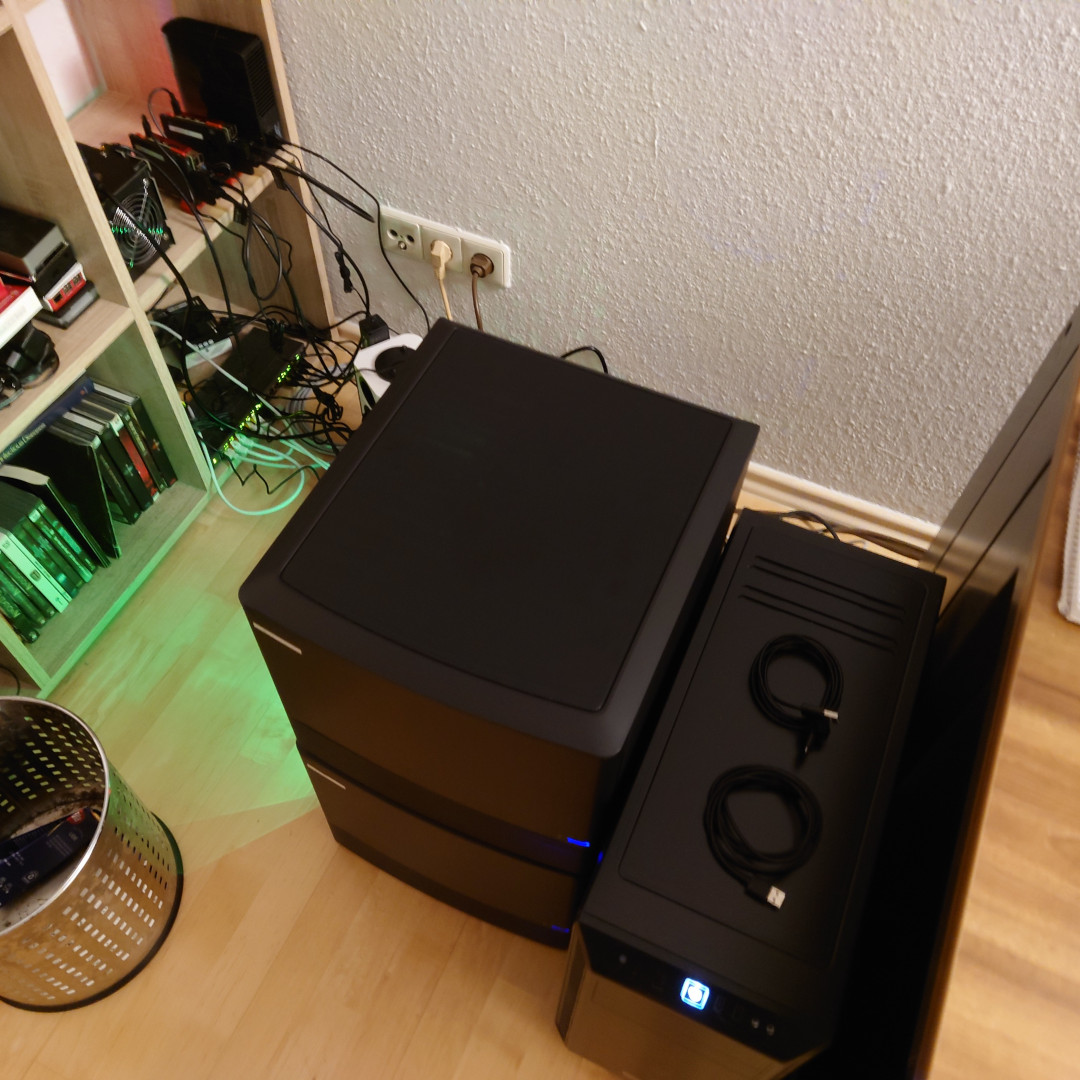
Those two large cases in the middle house my two Turing Pi 2 boards with four Raspberry Pi CM4s each. I’ve written about them here. The rightmost big tower case houses my “old” x86 server, which I’m retiring soon. The elongated black case with the fan grill in the front on the shelf is an Odroid H3, serving as a Ceph storage cluster node. The other two nodes I’ve currently got are running in VMs on the x86 server. I would like to move those onto another pair of H3s.
While a secondary goal for doing so is to reduce power consumption of the lab a bit, the main reason is that I’d like to spread out the Homelab a bit, so that I can take down a single machine whenever I like, without having to take down the entire Nomad cluster, all jobs running on it, and the storage cluster, and all of the CM4s, because they all netboot off of the Ceph cluster.
That’s my current main Homelab goal: Getting so far that I can take down any machine without disturbing the rest. One of the main drivers is that I’m now running externally visible services used by others out of it. And I really don’t want to deprive my Mastodon followers of my most intelligent and/or funny musings any longer than I have to during maintenance windows. 😉
But, you might say: This H3 case doesn’t look too big! You could easily fit two more into that Homelab corner of yours! And you’re right. I could.
But while the H3 case is generally okay, it has one large flaw: Noise. Here’s a picture from back when I assembled it:
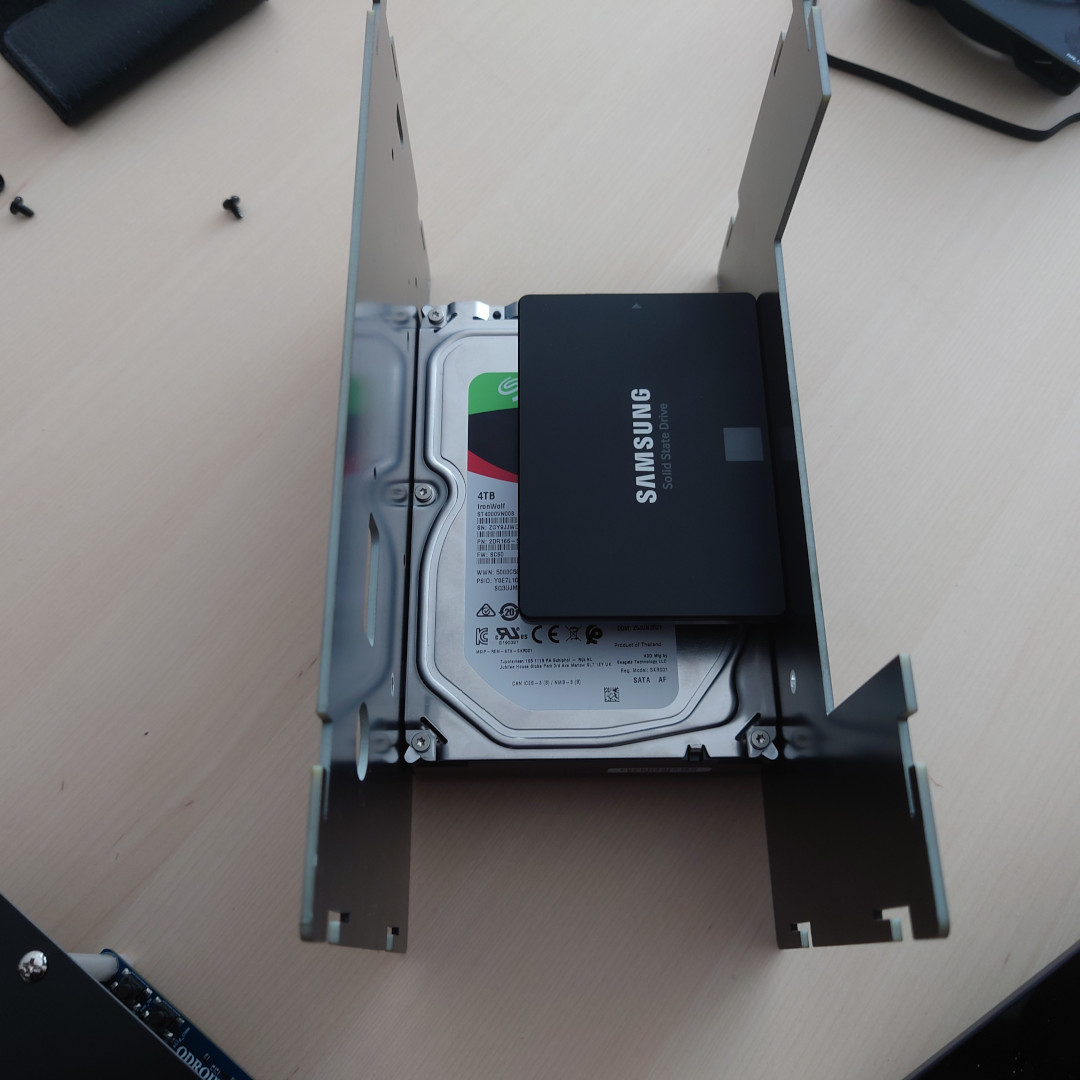
The HDD is the central, load-bearing element of the entire H3 case. This means that there is very little vibration isolation. In short, I can hear the disk very clearly in normal working conditions. And not just during disk access, but also just the sound from the rotating platters. It’s way too loud for my taste. So just putting the other two H3 I intend to buy into the same case, as well as keeping the current H3 in that case, are not viable plans for the future.
But, as can be seen on the first picture, if I add any more standard PC cases, my Homelab corner will be pretty cluttered. So I finally decided to bite the bullet and go full rack mounting for my Homelab.
The rack: It costs how much?!
At first, I wanted to buy a 15U rack at most. I just needed to put a couple of systems in there, right? But then I realized that I also want to put my other freestanding systems (two small NUC class machines) in there. And the switch should also have its space.
So I would need to find the space for the following machines in the rack:
- 5 Raspberry Pi 4 boards
- One UDOO x86 II
- One pretty small NUC style machine serving as my Command and Control machine
- Two ITX Turing Pi 2 boards
- Three Odroid H3 boards with enough space for some HDDs and SSDs
- One 16 port switch
That’s what I want to put into the rack. I might also put my networking gear, consisting of another 8 port switch, a WiFi router, my firewall appliance and my VDSL modem in there, but I haven’t really decided about that yet.
So even if I went with 2U for everything, I would end up with 6U for the H3, another 4U for the Turing Pi 2, 2U for the Pis and at least another 4U for the switch and the NUCs, for a total of 16U. Just to be on the safe side, I decided to go with a 25U rack.
And just looking at the prices for racks made me swallow pretty hard. I finally ended up with the StarTech 25U 4-poster rack. That one costs around 315,- € in Germany. Comes with a small set of cage nuts and coasters, which I like.
It also has adjustable depth. I will most likely make it 60cm deep, which fits comfortably into my Homelab corner without sticking out beyond the depth of my desk. That will also be plenty for the cases I chose.
Rack plan
The plan for putting in the different machines looks something like this:
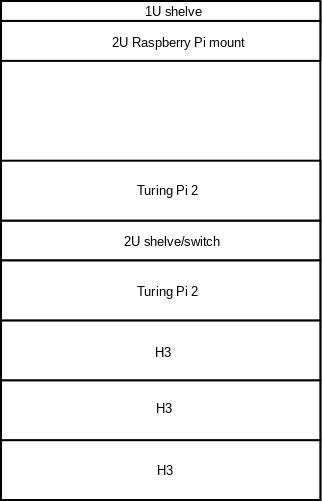
As the rack I chose is open at the top, I only put a 1U shelve there to put the Udoo and the NUC there. Depending on how much space I’ve left there, I will also put my other networking gear onto that top shelve. I put my Ceph nodes at the bottom, as they will be getting all the HDDs and consequently will end up being the heaviest part. The networking switch for the racked gear will be sitting in the middle. If I put all the other networking gear there as well, I might also put the 8 port switch on that shelve, on the backside.
I’ve also ordered two rack mountable power strips, which I will mount somewhere on the rack’s backside.
The Pis
A colleague at work introduced me to Racknex, an Austrian company. He send me the link after I told him how many deployed Pis I now have, noting that I might want to buy something from them. He put a laughing emoji after that. Joke’s on him, the package arrived yesterday. 😏
Racknex seems to be one of those wonderfully weird small companies which have found a delightfully weird niche and become highly comfortable in it. Their niche seems to be making rack mounts for just about everything. One amusing example is a mount for different AVM FritzBox models.
I’ve bought their 12 Raspberry Pi 2U mount. It is a pretty versatile mount, as you can’t just mount Raspberry Pis in the twelve slots, but also face plates for keystone modules. I have only bought six Pi mounts. The other six slots will remain open, as I need to use the opening for the USB cables to attach the SSDs to the Pis. They are also selling USB keystone modules, which would have given the entire thing a cleaner look, but here I made the one sensible decision in this entire endeavor and decided that just having the USB cables go in is enough. 😅
In the back of the mount, there are also a couple of mounting holes for SSDs I will be using.
My big worry with this mount is cooling for the Pis. Initially I thought: Okay, you’re just going to buy a couple of Noctua 60mm fans. Those are hopefully going to be quiet enough. Then I realized: I will somehow have to power them. And the Pi does not have any PWM capability. I could connect the fans to the 5V pin of the Pi’s GPIO header - but then they would go at full blast all the time. Not ideal with 60mm fans. In the end, I decided to forget active cooling for now. The Pis have pretty beefy heatsinks on them which are working fine right now. Hopefully they won’t get that much hotter in the closer confines of the rack.
I’m very happy with this mount. It looks like a great option for dense mounting of many Pis. A bit pricey, at 233,- €, but oh well.
The H3 and Turing Pi cases
The cases for the H3 and the Turing Pis were a completely different matter and it took me quite a while to find something I liked. Initially, the plan was to go with a 2U case. I was a little bit worried about the fans, but I found one which allowed 80mm and figured that using some good Noctuas will hopefully be quiet enough. The rack will be sitting next to my desk, in my living room. So quiet is rather important.
I had almost finished setting up the order when I returned to something which bothered me about the 2U case I had chosen. It mentioned that it was compatible with a standard ATX power supply with an 80mm fan. I finally went to the product page of the power supplies I’m already using and checked. They claimed a 120mm fan. That was the moment I realized that my assumption that they meant an 80mm top fan must have been wrong. Because ATX power supplies have standard dimensions. And if 80mm was for the top fan, how would my PSU be able to fit the ATX dimension and have a 120mm fan while the case allowed to fit an ATX PSU - but only one with 80mm fans?
It turns out that the 80mm fan was for a front to back alignment, not a top to bottom one, like I’m used to seeing on PC power supplies. So technically, my standard PC power supply would have fit perfectly fine in a 2U case - but its fan would have been mashed up against the top of the case and chocked there.
After some thinking I decided that going with a 3U case was the best choice now. It would allow for fitting a standard PC power supply without issue, and it would also allow for 120mm case fans. I addition, if I ever decide to switch to more standard components, I would have space for a decent CPU cooler.
I decided on this case. That should give me plenty of space for future expansion, and it allows for up to three 120mm fans. I will be replacing the buildin ones with a couple of Noctua 120mm fans.
Turing Pi 2 fan control
One last problem which remained to be solved: How to control the cooling fans in the Turing Pi 2 cases? Those boards don’t have case fan headers. After some searching, I finally decided to go with Noctuas fan controller. It allows me to control PWM fans with a manual dial.
Decorations
The thing isn’t going to be too much to look at. I generally don’t have a problem with being surrounded by tech - but the rack is open, and the side panels of my chosen case are just plain metal. I’m currently considering whether I might dig deep (and I would have to dig REALLY deep) to find where my artistic creativity is hiding. Or I might see whether there’s an artist who would be willing to lend me their creativity for a hefty sum of money. 😅
Final words
It took me quite a while to put all of this together, but I think I’m pretty happy with it now. I’m mostly worried about the noise at the moment. But that should be taken care of with the 3U cases with 120mm fans in them.
For now, I’ve only bought two of the cases and the Pi case. I will immediately mount the two Turing Pi 2 machines. But before I can mount the H3, I need to wait for a friend to finish a 3D print of H3 to Mini ITX adapters for me. Once I’ve got those, I will order the last two H3 and cases. I will also look into HDD noise reduction again.
In total, this “simple” change of mounts costs me a pretty penny. The only real thing I could have had cheaper was the Pi mount. Instead of using an actual rack mount, I could have gone with another shelf and put all the Pis on there. But I really liked the idea of the Pi rack mount. The rack itself as well as the cases are already the cheapest I could find. 19" rack mount cases are ridiculously expensive. No wonder everybody is moving to the cloud when you can easily plunk down a thousand bucks just on a single 19" server case.
I’ve already got most of the parts - only the rack itself somehow got itself lost somewhere in the current DHL strikes. Hopefully it finds its way to me soon.
Does anybody have any good tips? Anything else I should be thinking about?