
Wherein I document how I migrated some S3 buckets over to the Ceph Rook cluster and with that, made it load-bearing.
This is part six of my k8s migration series.
So why write a post about migrating S3 buckets, and why do it at this point of the Nomad -> k8s migration? In short, it just fit in here very well. I already planned to make Ceph Rook one of the first services to set up anyway. And then the logical next step is to have a look at what I can then migrate over without any other dependencies. And the answer to that was: Some non-service S3 buckets. With “non-service” I mean those buckets which are not directly tied to specific services running on the cluster, like Mastodon’s media files bucket or Loki’s log storage bucket. Those I will migrate over with their respective services.
Instead, the buckets I’m migrating over are things like my blog and wiki buckets. Those run on Hugo and have been served directly by my Traefik proxy from S3 buckets. So with the previous Traefik ingress setup and Ceph Rook being set up, I had all the dependencies in place.
The final reason to do it right now is that I wanted to make the cluster load-bearing ASAP. A little bit of that was to prevent myself from getting into too much experimentation. Let’s see whether that is going to pan out. 😅
Previous setup and advantages of the new one
Before getting into the S3 bucket setup with Ceph Rook and Ansible, let me talk briefly about how the current setup on my baremetal Ceph cluster worked.
In one word: Manually
So what’s needed to create an S3 bucket and a new user and to configure that bucket, manually?
Let’s start with the user creation:
radosgw-admin user create --uid=USERNAME --display-name "Description here"
This will output the new user’s access ID and secret key. To make the credentials usable by Nomad jobs, they also need to be written into Vault:
vault kv put secret/some/path id=ID key=-
This would plop up a prompt to enter the secret key. As my internal docs say:
NOTE THE SPACE AT THE BEGINNING OF THE LINE! That’s to prevent even the access ID from finding its way into your history.
I’d then use MinIO’s S3 client to create the bucket:
mc alias set s3-SERVICENAME https://s3.example.com
./mc mb s3-alias/BUCKETNAME
I’m using the MinIO client mostly because I like the interface, although I don’t use MinIO itself.
That creates a bucket which can only be accessed with the previously created credentials. To provide a full bucket policy, I’ve got to switch to a different command, namely s3cmd, as MinIO does not support bucket policies.
So I’m then putting the credentials in a second place, for use with s3cmd,
and then create a JSON file for the policy to finally upload it with a command
like this:
s3cmd -c .s3cmd.conf setpolicy policy.json s3://BUCKETNAME
All of the previous commands need to be entered in the right order and the right format, and for the right bucket with the right credentials. Lots of places for user error.
And that’s the main thing I’m gaining from the new approach with Ceph Rook and Ansible: Declarative creation of users, buckets and policies. This has the added bonus of finally being able to version-control the S3 bucket setup.
Creating users, buckets and policies declaratively
There are broadly three pieces to creating a bucket with my new approach:
- Create the S3 user in Ceph
- Write the credentials into Vault
- Use those credentials in Ansible to create the bucket and set policies
Before I continue, there’s one important note: Rook has an Object Bucket Claim. This CRD can be used to create buckets together with S3 credentials for that bucket in the form of a Secret. I will use this CRD later on, when I’m migrating actual services, to create their individual S3 buckets. And this is exactly what those bucket claims are intended for. But for the buckets I’m migrating here, I need access to them outside Kubernetes, and I need to do things like setting bucket policies to allow access for multiple users. The object bucket claim can do neither of those things. So using OBCs would defeat the purpose of creating everything declaratively.
Also worth mentioning is COSI, the Container Object Storage Interface. This is similar to the CSI, a provider-agnostic way to provide object storage buckets. But it’s currently still experimental, both in Kubernetes and in Rook.
With that out of the way, let’s create an S3 user in Rook. This is done with the CephObjectStoreUser CRD. It might look like this:
apiVersion: ceph.rook.io/v1
kind: CephObjectStoreUser
metadata:
  name: my-user
  namespace: rook-cluster
spec:
  store: rgw-bulk
  clusterNamespace: rook-cluster
  displayName: "A user for demo purposes"
When applying this manifest, Rook will create a user named my-user and
automatically create a Secret with the user’s credentials. This secret will
be stored in the given namespace, rook-cluster in this case. Note that by
default, Rook only allows creation of CephObjectStoreUser objects in the
namespace of the Rook operator itself. This can be overwritten during creation
of the CephObjectStore in the cluster Helm chart, but it seems to be a prudent
measure to only allow those who can write into the cluster namespace to
actually create users.
The name of the secret for the example above will be rook-ceph-object-user-rgw-bulk-my-user.
The first part is the Rook operator namespace name (note that this is not the
cluster namespace necessarily, but the operator’s NS). Then follows the string
ceph-object-user followed by the name of the CephObjectStore the user is
going to be created in. The last part is the username itself.
The secret will have the following data: section:
data:
  AccessKey: ABCDE
  Endpoint: s3.example.com:4711
  SecretKey: FGHIJ
So it will contain all the info necessary. Also always remember that data is
encoded in base64. So when extracting the credentials for use in other apps,
always push the strings through base64 --decode:
kubectl get -n rook-cluster secrets rook-ceph-object-user-rgw-bulk-my-user --template={{.data.AccessKey}} | base64 -d
kubectl get -n rook-cluster secrets rook-ceph-object-user-rgw-bulk-my-user --template={{.data.SecretKey}} | base64 -d
But of course, a declarative setup isn’t worth very much when you have to now manually push the credentials to Vault as in my old workflow. Instead, I will be using external-secret’s PushSecret. PushSecret’s allow me to push Secrets from Kubernetes to a provider, in a reversal of the ExternalSecret. In this instance, I’m using them to push the S3 credentials created by Rook to my Vault instance, for use in Ansible for the bucket creation.
The first step needed is to update the Vault policy used by the Vault AppRole used by external-secrets to allow it to not only read, but also write secrets:
path "secret/my_kubernetes_secrets/cluster/s3/users/*" {
  capabilities = [ "read", "create", "update" ]
}
This allows the AppRole to push secrets, but only to a specific path.
The PushSecret itself then looks like this, again using the credentials of the previously created user as an example:
apiVersion: external-secrets.io/v1alpha1
kind: PushSecret
metadata:
  name: s3-my-user
  namespace: rook-cluster
spec:
  deletionPolicy: Delete
  refreshInterval: 30m
  secretStoreRefs:
    - name: my-vault-store
      kind: ClusterSecretStore
  selector:
    secret:
      name:  rook-ceph-object-user-rgw-bulk-my-user
  data:
    - match:
        secretKey: AccessKey
        remoteRef:
          remoteKey: secret/my_kubernetes_secrets/cluster/s3/users/my-user
          property: access
    - match:
        secretKey: SecretKey
        remoteRef:
          remoteKey: secret/my_kubernetes_secrets/cluster/s3/users/my-user
          property: secret
Here again, for security reasons, the PushSecret needs to be in the same
namespace as the Secret it is pushing out to the provider. The deletionPolicy
defines what happens when the PushSecret is deleted. With Delete, the secret
in the secret store will also be removed. With Retain, the secret will be kept.
The selector selects the secret to be pushed, while data: defines what
actually gets pushed. With the config here and considering the Secret format
for S3 credentials created by Rook I showed above, the secret in Vault would
have the following format:
{
  "request_id": "foo",
  "lease_id": "",
  "lease_duration": 2764800,
  "renewable": false,
  "data": {
    "access": "ABCDE",
    "custom_metadata": {
      "managed-by": "external-secrets"
    },
    "secret": "FGHIJ"
  },
  "warnings": null
}
I’m not pushing the Endpoint from the original secret, as that’s not going to
change.
And this is part two done, the S3 credentials are now available to Ansible via Vault. Now the final part, actually creating the buckets.
I’m using Ansible’s s3_bucket module to create my buckets. Compared to using Rook’s OBC, this also allows me add a policy. Here is an example play:
- hosts: command_and_control_host
  name: Play for creating the my-bucket bucket
  tags:
    - example
  vars:
    s3_access: "{{ lookup('hashi_vault', 'secret=secret/my_kubernetes_secrets/cluster/s3/users/my-user:access token='+vault_token+' url='+vault_url) }}"
    s3_secret: "{{ lookup('hashi_vault', 'secret=secret/my_kubernetes_secrets/cluster/s3/users/my-user:secret token='+vault_token+' url='+vault_url) }}"
  tasks:
    - name: Create my-bucket bucket
      tags:
        - example
      amazon.aws.s3_bucket:
        name: my-bucket
        access_key: "{{ s3_access }}"
        secret_key: "{{ s3_secret }}"
        ceph: true
        endpoint_url: https://s3.example.com
        state: present
        policy: "{{ lookup('file','bucket-policies/my-bucket.json') }}"
I’m reading the access ID and secret key for S3 access from Vault into Ansible
variables because I’ve got a single “s3-buckets” playbook, creating different
buckets with different users, so using the AWS_* env variables doesn’t work.
The example will create a bucket with the credentials of the my-user user,
called my-bucket on the Ceph S3 server reachable via s3.example.com.
The policy option only accepts a JSON string, not a filename, hence the use
of the file lookup.
A policy for a bucket with public read, like the ones I’m using for my docs,
would look like this:
{
    "Version": "2012-10-17",
    "Statement": [
        {
            "Action": [
                "s3:ListBucket",
                "s3:GetBucketLocation"
            ],
            "Effect": "Allow",
            "Resource": [
                "arn:aws:s3:::my-bucket"
            ],
            "Principal": {
                "AWS": [
                    "*"
                ]
            }
        },
        {
            "Action": [
                "s3:GetObject"
            ],
            "Effect": "Allow",
            "Resource": [
                "arn:aws:s3:::my-bucket/*"
            ],
            "Principal": {
                "AWS": [
                    "*"
                ]
            }
        }
    ]
}
So that’s it. With three steps, I’ve created a bucket with a policy, and all of it is under version control. I only need to remember the following three commands:
# Deploy the User manifest to k8s
kubectl apply -f my-user-manifest.yaml
# Deploy the PushSecret manifest to k8s
kubectl apply -f my-push-secret-manifest.yaml
# Run the Ansible playbook
ansible-playbook s3-buckets.yaml
Besides some filenames, they’re going to be the same regardless of which bucket
I’m creating. Way nicer than having to remember the radosgw-admin, mc MinIO
client, vault and s3cmd incantations I showed in the previous section.
Migrating backup buckets
So let’s get to actually migrating some buckets. The first set I worked on were the S3 buckets for my backups. I will keep the description of the actual backup procedure short - first, this isn’t an article about backups, and second, mine has so many warts that I’m a bit embarrassed. 😉
My backups currently have two stages. First, I’m using restic
to back up the volumes of all of my services. There’s one bucket per service,
and the backup runs nightly. In addition, I’m backing up my /home on my desktop
and laptop. The second stage is backing up all of those buckets onto an external
HDD connected to one of my nodes, using rclone.
The only “special” thing about these backup buckets is that they need access for more than one user. There’s the restic backup user running the per-service backups. This user needs read and write access to every bucket. Then there’s the external backup user, which only needs read access to the backups. The S3 bucket policy for those buckets looks like this:
{
  "Version": "2012-10-17",
  "Statement": [
    {
      "Action": [
        "s3:GetObject",
        "s3:DeleteObject",
        "s3:PutObject",
        "s3:ListBucket",
        "s3:GetBucketLocation"
      ],
      "Effect": "Allow",
      "Resource": [
        "arn:aws:s3:::srv-name/*",
        "arn:aws:s3:::srv-name"
      ],
      "Principal": {
        "AWS": [
          "arn:aws:iam:::user/service-backup-user"
        ]
      }
    },
    {
      "Action": [
        "s3:GetObject",
        "s3:ListBucket",
        "s3:GetBucketLocation"
      ],
      "Effect": "Allow",
      "Resource": [
        "arn:aws:s3:::srv-name/*",
        "arn:aws:s3:::srv-name"
      ],
      "Principal": {
        "AWS": [
          "arn:aws:iam:::user/external-backup-user"
        ]
      }
    }
  ]
}
This policy is of course specific to my setup with restic and rclone. Other S3-capable backup tools might need additional or fewer permissions on the buckets.
I then just copied the buckets from the old cluster to the new cluster:
mc cp -a --recursive old-cluster-alias/my-bucket/ new-cluster-alias/my-bucket/
I will show a couple of metrics on the transfer speeds and so on in the later Metrics section.
Problems with mismatches between files and their hashes
During the migration of my backup buckets, I hit a pretty frustrating problem
which cost me a lot of time analyze. During the copying of the buckets with
mc as well as during the initial services backup run with restic, everything
looked fine.
Then I migrated over the external disk backup, and rclone suddenly started
throwing errors like this:
"Failed to sync with 4 errors: last error was: corrupted on transfer: md5 hash differ \"95110ecafcd3c5f37c29fa9dd8157cce\" vs \"fe25b63800d5d9cab3174297fc8480ce\""
"ERROR : Attempt 3/3 failed with 4 errors and: corrupted on transfer: md5 hash differ \"95110ecafcd3c5f37c29fa9dd8157cce\" vs \"fe25b63800d5d9cab3174297fc8480ce\""
"ERROR : Local file system at /hn-data/usb-mount/buckets/backup-mail: not deleting directories as there were IO errors"
"ERROR : Local file system at /hn-data/usb-mount/buckets/backup-mail: not deleting files as there were IO errors"
"ERROR : data/9e/9ea8a2f41ef73cb02ea0c4076c907210f814c26d92d22a5e59fafa1821c1f356.xabetij7.partial: corrupted on transfer: md5 hash differ \"95110ecafcd3c5f37c29fa9dd8157cce\" vs \"fe25b63800d5d9cab3174297fc8480ce\""
"ERROR : data/51/519f791addd43bbb94b9edc9b0bf1bb7608a0736fd76b97fa126867b7aa5acc2.homotep1.partial: corrupted on transfer: md5 hash differ \"0508dafb993525a6579d84cb8172c954\" vs \"24533a2effbf7d84b799d811f14e1dd3\""
"ERROR : data/4a/4afea197e24fb5136beae05e5f86003cebf37e9b0d8cc020248307727c9fef93.gusidof8.partial: corrupted on transfer: md5 hash differ \"647135d3de83dd64e398026c6cc8a1dd\" vs \"9eb1ded016386b727c35b29df58afe80\""
"ERROR : data/dd/dd6c50ae7e5b26aede0726128dc2d0f113dc896ffcabadd78b0e44bdd48226f8.hagoqic7.partial: corrupted on transfer: md5 hash differ \"778f53d5a2987ebc060a9fce0b476613\" vs \"a7b482f2a64b634558587dc3f3518c39\""
"ERROR : Attempt 2/3 failed with 4 errors and: corrupted on transfer: md5 hash differ \"95110ecafcd3c5f37c29fa9dd8157cce\" vs \"fe25b63800d5d9cab3174297fc8480ce\""
"ERROR : Local file system at /hn-data/usb-mount/buckets/backup-mail: not deleting directories as there were IO errors"
"ERROR : Local file system at /hn-data/usb-mount/buckets/backup-mail: not deleting files as there were IO errors"
"ERROR : data/9e/9ea8a2f41ef73cb02ea0c4076c907210f814c26d92d22a5e59fafa1821c1f356.rewijes9.partial: corrupted on transfer: md5 hash differ \"95110ecafcd3c5f37c29fa9dd8157cce\" vs \"fe25b63800d5d9cab3174297fc8480ce\""
"ERROR : data/dd/dd6c50ae7e5b26aede0726128dc2d0f113dc896ffcabadd78b0e44bdd48226f8.sixuwuf0.partial: corrupted on transfer: md5 hash differ \"778f53d5a2987ebc060a9fce0b476613\" vs \"a7b482f2a64b634558587dc3f3518c39\""
"ERROR : data/4a/4afea197e24fb5136beae05e5f86003cebf37e9b0d8cc020248307727c9fef93.filorut1.partial: corrupted on transfer: md5 hash differ \"647135d3de83dd64e398026c6cc8a1dd\" vs \"9eb1ded016386b727c35b29df58afe80\""
"ERROR : data/51/519f791addd43bbb94b9edc9b0bf1bb7608a0736fd76b97fa126867b7aa5acc2.doyahiy9.partial: corrupted on transfer: md5 hash differ \"0508dafb993525a6579d84cb8172c954\" vs \"24533a2effbf7d84b799d811f14e1dd3\""
"ERROR : Attempt 1/3 failed with 4 errors and: corrupted on transfer: md5 hash differ \"95110ecafcd3c5f37c29fa9dd8157cce\" vs \"fe25b63800d5d9cab3174297fc8480ce\""
"ERROR : Local file system at /hn-data/usb-mount/buckets/backup-mail: not deleting directories as there were IO errors"
"ERROR : Local file system at /hn-data/usb-mount/buckets/backup-mail: not deleting files as there were IO errors"
"ERROR : data/9e/9ea8a2f41ef73cb02ea0c4076c907210f814c26d92d22a5e59fafa1821c1f356.sosepip8.partial: corrupted on transfer: md5 hash differ \"95110ecafcd3c5f37c29fa9dd8157cce\" vs \"fe25b63800d5d9cab3174297fc8480ce\""
"ERROR : data/dd/dd6c50ae7e5b26aede0726128dc2d0f113dc896ffcabadd78b0e44bdd48226f8.dalatiy1.partial: corrupted on transfer: md5 hash differ \"778f53d5a2987ebc060a9fce0b476613\" vs \"a7b482f2a64b634558587dc3f3518c39\""
"ERROR : data/4a/4afea197e24fb5136beae05e5f86003cebf37e9b0d8cc020248307727c9fef93.midizaw6.partial: corrupted on transfer: md5 hash differ \"647135d3de83dd64e398026c6cc8a1dd\" vs \"9eb1ded016386b727c35b29df58afe80\""
"ERROR : data/51/519f791addd43bbb94b9edc9b0bf1bb7608a0736fd76b97fa126867b7aa5acc2.vonupuf0.partial: corrupted on transfer: md5 hash differ \"0508dafb993525a6579d84cb8172c954\" vs \"24533a2effbf7d84b799d811f14e1dd3\""
"NOTICE: data/4a/4afea197e24fb5136beae05e5f86003cebf37e9b0d8cc020248307727c9fef93: Not decompressing 'Content-Encoding: gzip' compressed file. Use --s3-decompress to override"
The first thing to note here is that the error did not appear for every file, nor
did these errors show up for every bucket. The above example comes from a very
small 350KB bucket with 15 files total. I never saw this same error for my 50GB
/home backup bucket.
After some false starts, I was at least able to verify that the error was right,
the MD5 sum (also called “ETag” e.g. in the mc stat output) did not fit the
file. I had no idea what’s going wrong. My next test was to create a completely
new copy of one of the buckets, without running a service backup job against it,
to see whether it was restic that corrupted the bucket. But the errors showed
up immediately after syncing. I was also able to reproduce them by doing a local
rclone sync new-ceph-alias:backup-mail on my desktop, so it wasn’t some weird
quirk of my backup jobs either.
For checking the checksum of a file in an S3 bucket, I used s3cmd like this:
s3cmd -c ~/.s3cmd-conf-file info s3://backup-mail/filename
The output might look like this:
s3://backup-mail/filename (object):
   File size: 2512
   Last mod:  Wed, 17 Jan 2024 22:31:15 GMT
   MIME type: application/octet-stream
   Storage:   STANDARD
   MD5 sum:   9eacc1551b0e80f38f77443aa33dc0d1
   SSE:       none
That was about the point where I got really nervous - were my backups corrupted
without me noticing? So I ran restic’s check command on both, the new and
the old buckets:
restic repair index -r s3:s3.example.com/backup-mail
This command came back with “no errors” on both the old and the new buckets.
I also got pointed in the completely wrong direction once, because I called this command on one of the problematic files:
rclone check --download rooks3:backup-mail/my-dir/ cephs3:backup-mail/data/dd/
2024/01/18 22:40:53 NOTICE: S3 bucket backup-mail path my-dir: 0 differences found
2024/01/18 22:40:53 NOTICE: S3 bucket backup-mail path my-dir: 1 matching files
So, the files were supposedly matching. For now, I was
convinced that the files themselves were perfectly fine, and there was just
something wrong with the MD5 sums.
After some further digging, I found out that restic uses the MinIO client lib
as their S3 backend. And I had also used MinIO’s mc client to do the
bucket-to-bucket copying. So I thought: Okay, there’s definitely a bug in
MinIO’s client lib! Hurray, progress! I was able to confirm this by using
rclone sync to do the bucket-to-bucket copy, and subsequent rclone sync to
local did not fail. But then I got the same rclone sync errors again after
I had run the first restic backup against the new buckets.
This in turn lead me to believe that there was something wrong with restic. But
I couldn’t find anything at all on the Internet. It seemed I was the only person
seeing this error. I then updated all my restics, rclones and mcs to the newest
versions.
No dice, still the same error. That was when I started doubting the Ceph Rook setup and questioning the entire Kubernetes migration.
And then, I a state of utter frustration, I ran the rclone sync again. And
this time, I looked at the actual errors more closely. And for the first time
in this multi-day investigation really perceived this line:
my-file: Not decompressing 'Content-Encoding: gzip' compressed file. Use --s3-decompress to override
And it hit me like a brick. I’m pretty sure I woke up my neighbors with the facepalm I did. It was my Traefik config. I had enabled the Compression Middleware. And in my Ceph Rook setup, in contrast to my baremetal setup, Ceph S3 was only reachable through my Traefik ingress. After disabling the compression middleware, no MD5 sum problems occurred.
I have to admit that at this point, the story pretty much ends. I have no complete explanation of what might be going on here. The error message above suggests that a compressed file reached the S3 bucket and got stored there - but that doesn’t really make much sense, because the compression middleware only handles responses, it doesn’t touch the requests, from what I see in the docs at least.
If anybody has a theory or even better, an actual explanation, I would very much love to hear it, e.g. via the Fediverse.
Migrating my Hugo blog and wiki
Another pair of migrations which might be interesting to some of you were my blog and my internal docs. Both run on Hugo. One of these days I will actually get around to writing the obligatory “How I’m running this blog” post, but that day is not (really) today. 😁
In short, Hugo is a static site generator, fed with Markdown files. I generate the files in my CI and then push them into an S3 bucket. That bucket is then directly served via my Traefik proxy.
I’m running both, the blog and wiki, via my Traefik ingress in the new k8s setup. The IngressRoute manifest for the blog is the more interesting one:
apiVersion: traefik.io/v1alpha1
kind: IngressRoute
metadata:
  name: blog
  annotations:
    external-dns.alpha.kubernetes.io/hostname: "blog.mei-home.net"
    external-dns.alpha.kubernetes.io/target: "some-host.none-of-your-bussiness"
spec:
  entryPoints:
    - dmz
  routes:
    - kind: Rule
      match: Host(`blog.mei-home.net`)
      middlewares:
        - name: blog-index
          namespace: blog
        - name: blog-bucket
          namespace: blog
        - name: blog-amz-headers
          namespace: blog
      services:
        - kind: Service
          name: rook-ceph-rgw-rgw-bulk
          namespace: rook-cluster
          port: http
          scheme: http
At the top, I’m setting up DNS for the blog. This is only used internally. The target is my internal fortress host, the only one reachable externally.
Then I specify the entry point as my DMZ entry point, the only port that the DMZ can reach on the inside.
The rule itself is not too interesting, as the meat of the setup is found in the middlewares. They look like this:
apiVersion: traefik.io/v1alpha1
kind: Middleware
metadata:
  name: my-blogs-bucket
spec:
  addPrefix:
    prefix: /the-blogs-bucket
---
apiVersion: traefik.io/v1alpha1
kind: Middleware
metadata:
  name: blog-index
spec:
  replacePathRegex:
    regex: (.*)(?:\/$|(\/[^\.\/]*)$)
    replacement: ${1}${2}/index.html
---
apiVersion: traefik.io/v1alpha1
kind: Middleware
metadata:
  name: blog-amz-headers
spec:
  headers:
    customResponseHeaders:
      x-amz-meta-s3cmd-attrs: ""
      x-amz-request-id: ""
      x-amz-storage-class: ""
      x-rgw-object-type: ""
The first one, my-blogs-bucket, is a simple rewrite rule, which adds the
bucket’s name to the URL right after the root. This turns a URL like
/posts/k8s-migration-5-s3-buckets/ into /the-blogs-bucket/posts/k8s-migration-5-s3-buckets/.
But with that, there’s still no HTML file. And Traefik, being mainly a proxy,
not a webserver, doesn’t have any tricks to automatically add an index file.
This problem is solved by the second Middleware, blog-index. It takes the path
and appends /index.html to it. But only if the path ends on a /. But even
that is not enough. Because some browsers seem to actively remove a / at the
end of a URL? That’s what the second part does. It makes sure that all paths
which don’t lead to a file are also appended with /index.html, even when they
don’t end on /.
The last middleware, blog-amz-headers, just removes some S3 headers which
Ceph’s RGW tacks on by default, and which really don’t need to leave my network.
And that’s it for the migrations. There were a couple of other utility buckets, but they really aren’t that interesting. Instead, let’s go for some pretty plots. 🤓
Metrics
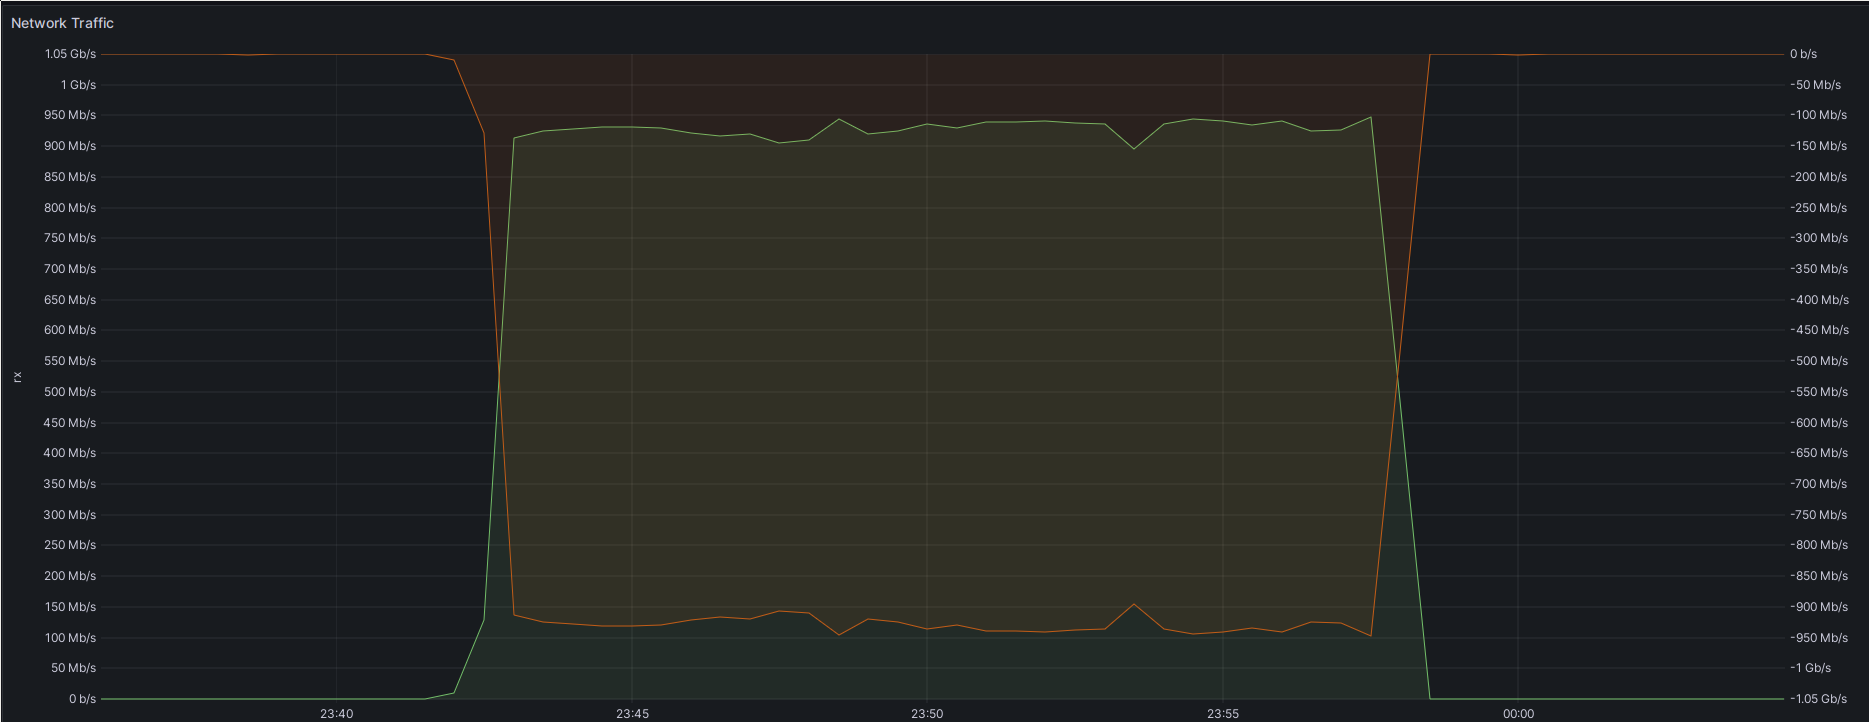
The first thing to note is that my transfer speed from a bucket on the old cluster
to the new cluster with mc cp -a --recursive capped out at around 50MiB/s.
This is way below line speed of my 1GB/s network. My disk IO on the receiving
Ceph hosts was around 80%, with about 55MB/s writes.
At first, I wasn’t able to find the bottleneck. My command and control host,
where I was running the Simplified view of the network.mc cp command, only showed about 400Mbit/s worth of transfers
in either direction. But then I recalled the network path, which looks something
like this:
All of the involved hosts - the Ceph hosts from the two Ceph clusters and the
C&C host running mc cp are connected to the same switch, but in different
VLANs. So to get from the C&C hosts to the Ceph hosts, the data needs to go
through the router, an OPNsense box in my case. The problem is the connection
from the router to the switch. It needs to carry the same traffic twice.
First, the traffic from the source cluster goes through the LAN NIC to the router,
and then out the same NIC but on a different VLAN to the C&C host. Then the C&C
host sends that data right back to the router’s LAN NIC, where it leaves again
through the same NIC on my Homelab VLAN and finally reaches the Rook Ceph host.
Here is an example plot of the network traffic on one of the Ceph hosts involved: Network traffic on one of my Ceph hosts during one of the transfers. Network traffic on the LAN interface of my router.
Next, let’s look at the power consumption of it all. Due to running more HW than
normal, supporting both my Nomad and k8s clusters in parallel, the power usage
of my Homelab already grew from an average of 150W to about 200W. But these
S3 transfers tacked on another 130W: Overall Homelab power consumption during one of the bucket transfers.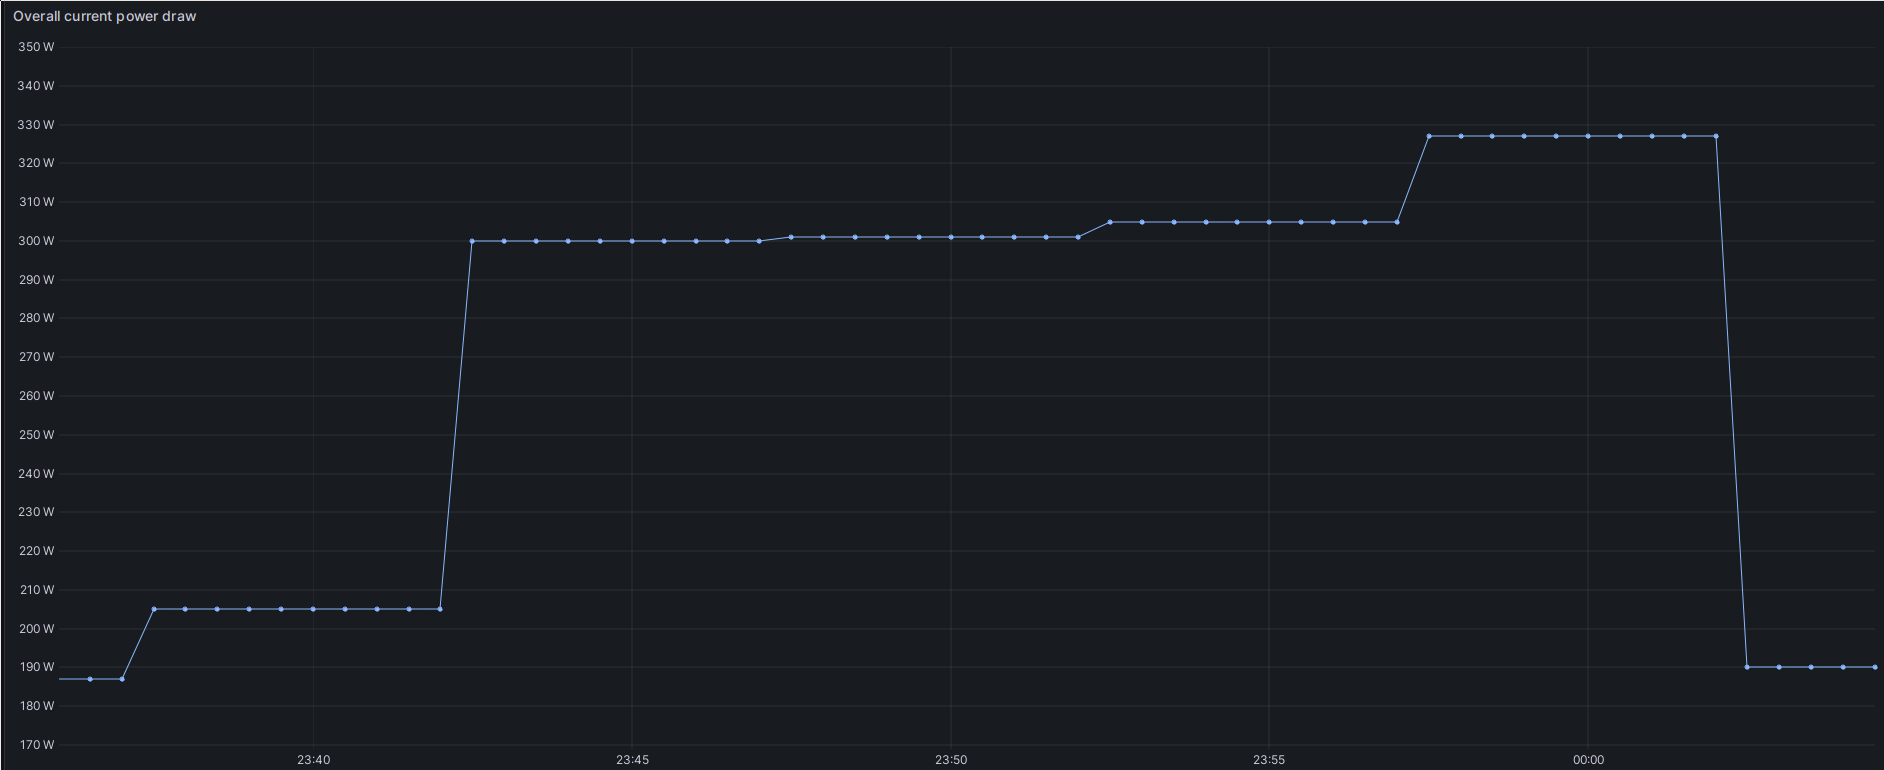
What I’m actually a little bit curious about: How much of that increase comes from the switch?
Finally, let’s have a short look at disk usage. On both Ceph clusters, the S3
buckets reside on HDDs, while their indexes reside on SSDs.
First, the view of one of the source cluster’s machines: IO utilization of one of the source Ceph hosts in the transfer. IO utilization of the other source Ceph hosts in the transfer.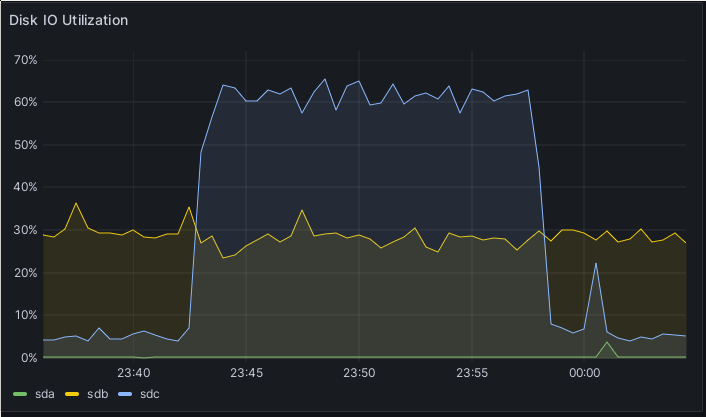
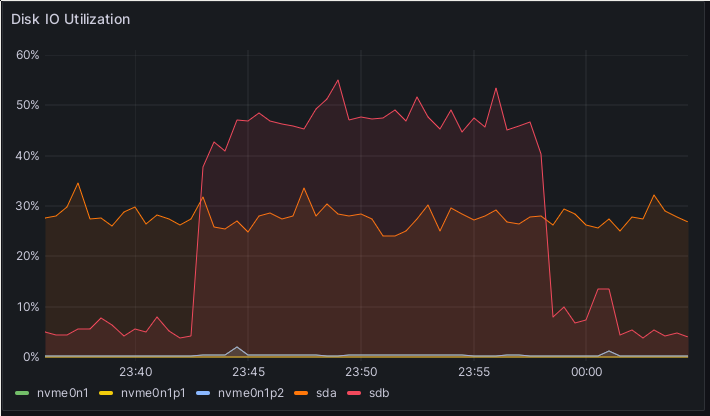
Finally, let’s have a look at one of the receiving hosts in the Ceph Rook
cluster. I will only show the metrics of one of them here, because the other one
is a VM, and the IO values don’t make too much sense. IO utilization on one of the Ceph Rook destination hosts in the transfer.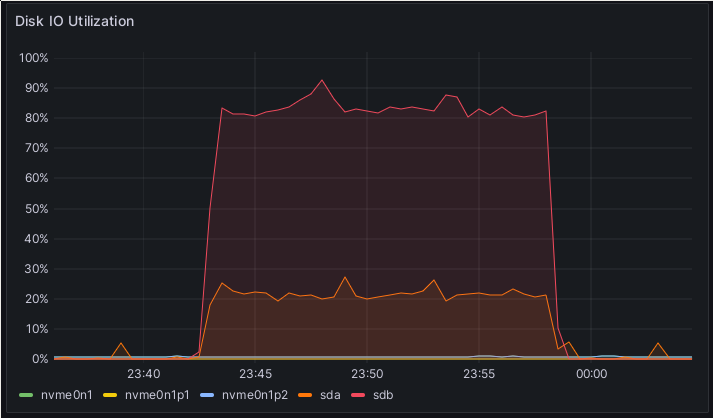
Here we can see that the raw data is not the only thing which needs to be written during S3 operations. The higher curve, going up to around 80%, is the host’s HDD. There the actual S3 data is stored. The 20% curve is the SATA SSD in the host, it holds the index of the S3 buckets. The writes come out to about 55MB/s on the HDD, as expected. Surprisingly, the read and write on the SSD is almost zero, so I’m wondering what’s producing the IOPS here?
And that concludes the “pretty plots” section of this post. 🤓
Conclusion
This was supposed to be a mostly mechanical action to do during the work week, with not much thinking required. It turned into a really frustrating matter through the difficult to debug Traefik compression issue. And this was only half the issues I saw. The other half was created by sudden connection loss during bucket copies. This one was solved by adding an outgoing firewall rule, but I decided to add that to the Cilium Load Balancer post as an update, as that’s going to be easier on future readers.
But still, I’m done now. The k8s cluster is officially load-bearing. What could possibly go wrong, running two very different workload orchestrators, both critical to the Homelab’s function? 😅