
Wherein I talk about the setup of Ceph Rook on my k8s cluster.
This is part five of my k8s migration series.
The current setup
I’ve been running Ceph as my storage layer for quite a while now. In my current Nomad setup, it provides volumes for my jobs as well as S3 for those apps which support it. In addition, most of my Raspberry Pis are diskless, netbooting off of Ceph’s RBD block devices as their root. At first glance, Ceph might look like you’d need an Ops team of at least three people to run it. But after the initial setup, I’ve found it to be very low maintenance. Adding additional disks or entire additional hosts is very low effort. I went through the following stages, with the exact same cluster, without any outages or cluster recreation:
- Baremetal on my single homelab server - bad idea, as that server also needed to mount Ceph disks
- On a single VM on that same server
- Spread over four LXD VMs on that server
- Spread over three LXD VMs on that server and a Raspberry Pi CM4 in an IO board with a SATA card attached
- My current config, with three dedicated baremetal machines
Before I started my migration, I had a setup with three x86 hosts, each with one 1TB SATA SSD and one 4TB HDD. Overall, I was using only about 40% of that storage. I then had several pools configured, each with a replication factor of “2”. This works pretty much like a RAID1 setup, where all data is mirrored on two disks. Or, in my case, on two different hosts even. This allows me to reboot any of my hosts without any outages, as I’ve configured Ceph to be okay with only one replica when a host is down.
For the migration, I took out my emergency replacement HDD and SSD and put them into my LXD VM host to create another VM with those two drives. I then also took one of my baremetal hosts out of my baremetal cluster for later addition to the Kubernetes cluster.
All of this allowed me to keep my baremetal cluster running without interruption, continuing to supply my Nomad cluster with storage, while I have a whole separate, Ceph Rook based cluster for the migration. Once I’m done with the migration, I will add the two other baremetal hosts to the Rook cluster and remove the Ceph VM.
I got pretty lucky that I happen to have enough HW and disks laying
around to be able to afford two clusters. It’s what allows me to do this migration
at my own pace, iteratively. I’m really enjoying that there’s no pressure to
finish the migration and I can go on detours like my recent implementation of
LoadBalancer services with Cilium.
Why Rook
So, considering how happy I am with baremetal Ceph, why switch to Rook? First it
is of course some portion of just wanting to try something new. Then there’s the
idea of having what’s called a hyperconverged infrastructure. With running
Ceph on Kubernetes instead of stand-alone, I can also run other workloads on
those hosts, which are idling for a lot of the time in the current setup.
It allows me to use my
resources more efficiently. I’m not implementing this right now, having added
a NoSchedule taint to my Ceph hosts. This is mostly because I’m still unsure
of the behavior when I have to take the entire cluster down. Most of my services
will need Ceph, but they might get scheduled before the Ceph pods, on the Ceph
hosts.
I understand that I can work with PriorityClass here, but I have not gotten
to wrapping my head around that.
Another really important point: Ceph Rook is very declarative, as you’ll see shortly. Baremetal Ceph with Cephadm, on the other hand, is mostly invoking commands by hand. There are no good ways to version control my Ceph cluster setup at the moment. I’ve had to keep meticulous notes about the commands I need to execute.
But Rook is not all milk and honey. Rook can, for example, not use the same
pool for multiple storage types. A pool is either only for RBD, CephFS or RGW usage. No
mixing. So I will have to create multiple pools. In my current setup, I just
have a generic bulk and fast pool, with HDDs and SSDs respectively. Those
are then used for all three storage applications.
Furthermore, Ceph’s dashboard does not support Rook as an orchestrator very well
right now. Several pieces of information I can see in my baremetal dashboard
are “N/A” on the Rook Ceph dashboard.
Here is an example:
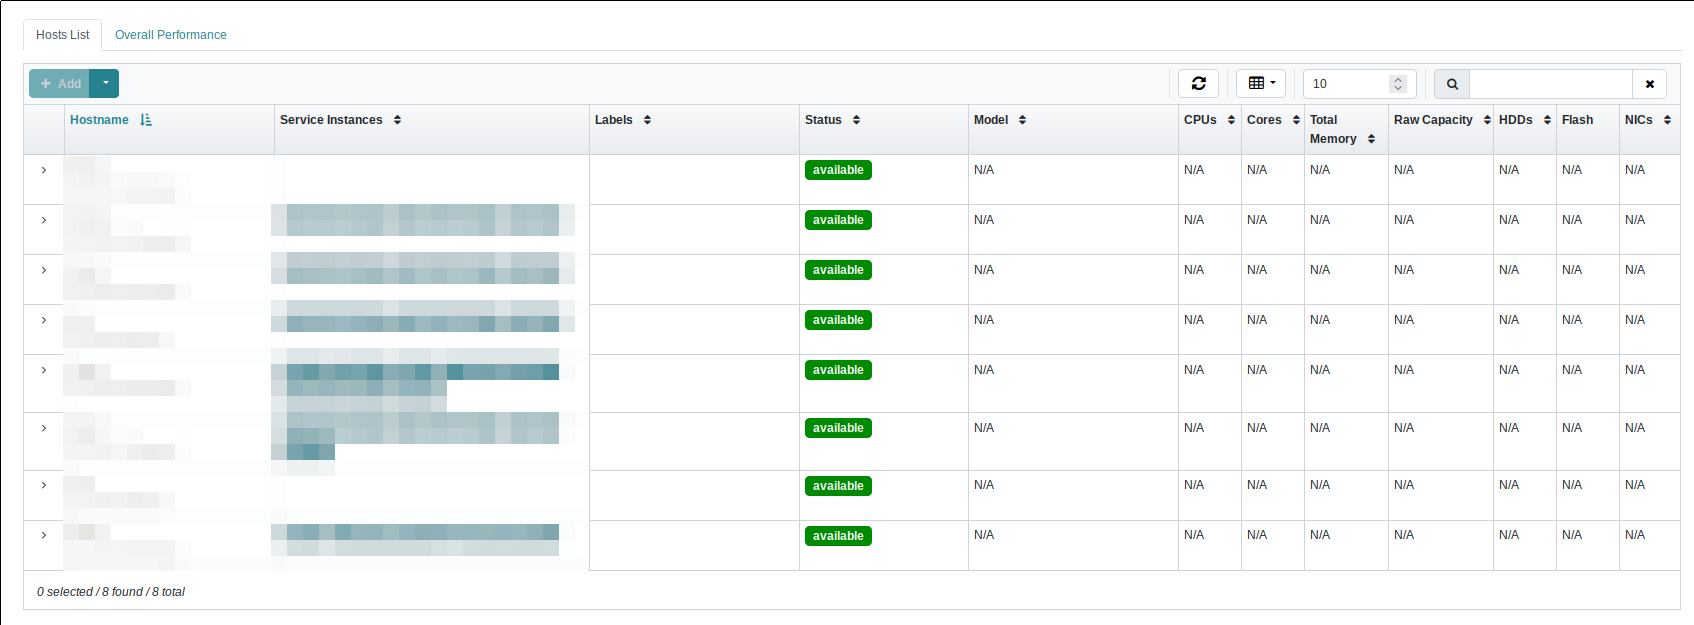
The Host List of the Ceph Dashboard. No information at all is shown about any of the nodes.
The dashboard data is pretty useless, with not showing any HW data about the hosts.
It looks similarly in the Services overview, which shows completely wrong
service counts. At least the OSD overview is entirely correct. The same is
true for the Pools, Block and File Systems UIs. But the Ceph RGW/S3 UI
is just not supported at all. Even with RGWs deployed and working, the dashboard
shows me that RGW access failed.
The problems with the dashboard are known and are currently being worked on by
the Rook maintainers. It also isn’t a pure dashboard problem, but the same problem
occurs for the data visible via ceph orch ps, where the columns Ports, Mem Use
and Mem Lim are empty, and the Version column just shows <unknown>.
Not great to be honest, but I assume this kind of info just didn’t seem too
urgent, because it is also available directly via Kubernetes.
Finally, one rather sad point: There’s no official migration path between Ceph baremetal and Ceph Rook. Yes, there’s some wild guides floating around, but I don’t trust any of them with my data, as they all invariably contain some variation of “after you’ve finished fuzzing around with the cluster ID…”.
So what I’ll do instead is manual migrations. I still have to look into Ceph RBD
import/export. I also thought about using Ceph’s mirroring features, but the
setup of that between the baremetal and Rook clusters doesn’t really look worth
it. So it will likely just come down to mounting both volumes on one host and
using trusty old rsync.
Ceph Rook setup
To set up Rook, I’m using the Helm charts. There are two of them, one for the Rook operator and one for the cluster. With this separation, multiple clusters can be controlled by the same operator. I’m not using that capability here, though.
The initial node setup isn’t too interesting, safe for one thing, namely
the taints. As I noted above, while I would like to share the resources of the
Ceph hosts with other deployments, for now I’ve added a NoSchedule taint.
I’m adding this taint via the kubeadm join config:
apiVersion: kubeadm.k8s.io/v1beta3
kind: JoinConfiguration
nodeRegistration:
{% if 'kube_ceph' in group_names %}
  taints:
    - key: "homelab/taint.role"
      operator: "Equal"
      value: "ceph"
      effect: "NoSchedule"
{% endif %}
  kubeletExtraArgs:
{% if 'kube_ceph' in group_names %}
    node-labels: "homelab/role=ceph"
{% elif 'kube_controllers' in group_names %}
    node-labels: "homelab/role=controller"
{% elif 'kube_workers' in group_names %}
    node-labels: "homelab/role=worker"
{% endif %}
This file is put through Ansible’s Template module
during initial host setup, and I’m then just joining the node to the cluster
via kubeadm join --config /path/to/join.yaml. Here, the homelab/taint.role=ceph
taint is added to all Ceph hosts, which are in my kube_ceph Ansible group.
Depending on which parts of Ceph you would like to use, you will also need to
make sure that all nodes (not just the Ceph nodes) have the rbd and ceph
kernel modules.
Rook operator setup
As always, I’m constructing my setup by reading through the default values.yaml file.
But before looking at the config, let’s look at what the operator actually does: It takes the Ceph Rook CRDs and creates a full Ceph cluster from them, including all the daemons necessary to run a full Ceph cluster. It also takes care about changes in the CRDs and starts new daemons and re-configures and deletes existing ones.
My configuration is rather simple:
tolerations:
  - key: "homelab/taint.role"
    operator: "Equal"
    value: "ceph"
    effect: "NoSchedule"
nodeSelector:
  homelab/role: ceph
priorityClassName: system-cluster-critical
csi:
  enableMetadata: true
  clusterName: k8s-rook
  provisionerTolerations:
    - key: "homelab/taint.role"
      operator: "Equal"
      value: "ceph"
      effect: "NoSchedule"
  serviceMonitor:
    enabled: false
  nfs:
    enabled: false
enableDiscoveryDaemon: true
discoveryDaemonInterval: 6h
There’s not actually that much to configure in the operator itself. Most of the Ceph config is done in the next chart, which defines the cluster proper.
First of all, I’m defining some things for the deployment of the operator pod.
It should tolerate the previously mentioned NoSchedule taint on Ceph nodes
and also gets a nodeSelector for those nodes. Furthermore, I’m assigning it
the highest scheduling PriorityClass.
I’m not entirely sure this is really necessary, though. I’ve just done it out of
reflex, because Ceph is pretty important in my Homelab stack. But the Operator
itself is not that important once the cluster has been initialized, until there’s
a change in the cluster CRDs. In that case, the operator would be needed to make
the changes.
Then there’s the CSI configs. In short, CSI is the Container Storage Interface. A standard for supplying storage to workloads. It’s not Kubernetes specific, although most implementations have been developed for k8s. I’m using Ceph’s CSI driver on my Nomad cluster, for example. It consists of two parts. One is the provisioner, which manages the volumes and talks to the Ceph and k8s clusters. The second part is a pod on each node, which is mostly concerned with mounting the actual volumes when a pod running on that node needs it.
I’m defining the Ceph NoSchedule toleration here again, because this is
another piece of the infrastructure I want to allow to run on the Ceph nodes. But
I’m not defining a nodeSelector on the Ceph nodes, because I don’t want to
completely overload them, and it doesn’t matter much where the provisioners are
running. While initially writing this, I had the following additional line
under the csi key in the values.yaml file:
provisionerNodeAffinity: "homelab/role=ceph;"
But then, while writing a couple of things about which pods are deployed by the operator, I realized that one of my MGR pods was in the pending state - no space left on the two Ceph nodes. So I ended up removing the node affinity for the provisioner pods, which balanced everything out again.
As in previous charts, I’m explicitly disabling the metrics gathering, which I will look at again later.
Finally, the enableDiscoveryDaemon and discoveryDaemonInterval configs
are related to dashboard functionality. As I’ve shown above, the dashboard does
not show all disks at the moment. But without these options, the entire
Physical Disks page would be empty.
Okay. While looking at the pods in the operator namespace to verify which were
launched by the operator before any cluster was defined, I realized why I’m not
getting any data on disks from my Ceph hosts: I did not set the Ceph NoSchedule
toleration on the discovery daemon containers. 🤦
Here is what the “Physical Disks” page of the dashboard looked like up to now:
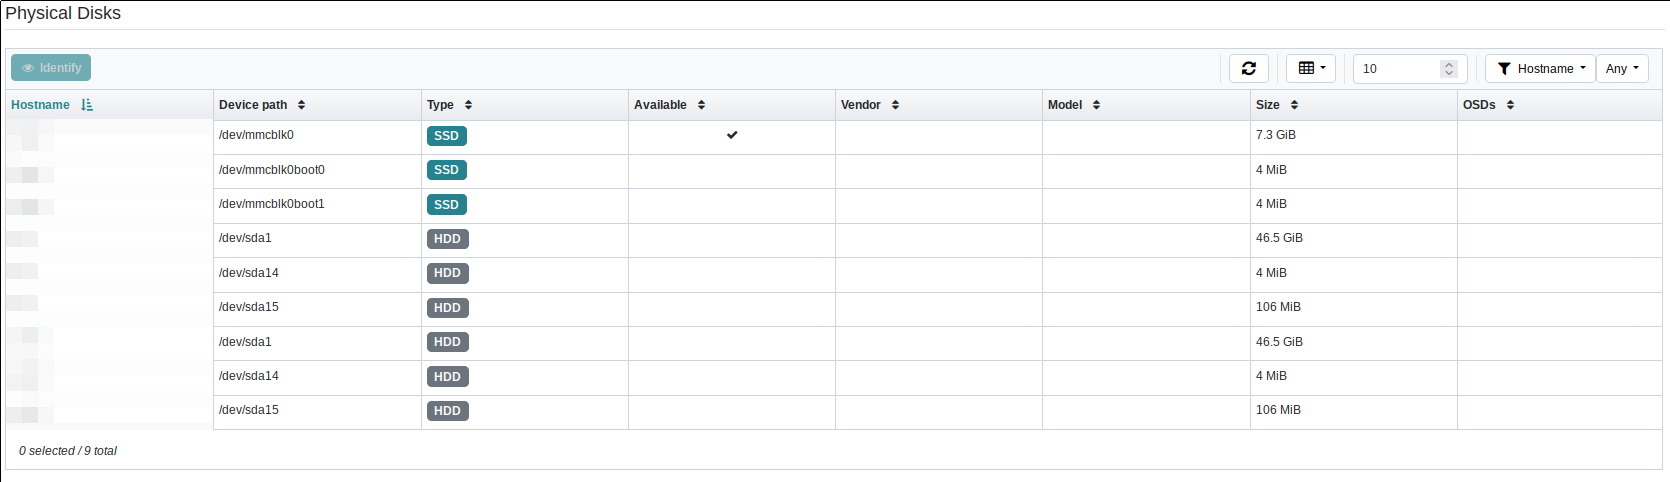
The physical disks list of the Ceph Dashboard. Note here that this list doesn’t actually contain any of my Ceph hosts, and consequently none of the disks which are actually used as OSD disks at the time this screenshot was taken are actually shown.
After the above realization, I’ve added the following into the operator
values.yaml:
discover:
  tolerations:
    - key: "homelab/taint.role"
      operator: "Equal"
      value: "ceph"
      effect: "NoSchedule"
This makes the disks visible:

The physical disks in my Ceph nodes finally appeared.
Once the Helm chart for the operator is deployed, it will create a pod of the operator itself as well as pods for the enabled CSI provisioners. In my case, these are the RBD and CephFS provisioners. Note that at this point, the actual Ceph cluster is not yet defined. None of the Ceph daemons have been created, as the cluster is only defined in the next chart.
Rook cluster setup
Now that the operator is running, I could create the actual Ceph cluster. This is done via a separate Helm chart which can be found here.
This chart sets up the cluster with all its daemons, like the MONs, OSDs and so forth. It can also be used to create pools for RBD, CephFS and RGW usage and storage classes to make those available in the k8s cluster.
I will discuss my values.yaml file in pieces, to make it more manageable.
Let’s start with some housekeeping:
clusterName: k8s-rook
operatorNamespace: rook-ceph
toolbox:
  enabled: false
monitoring:
  enabled: false
Here I’m supplying a cluster name (you know, just in case I end up running multiple clusters one day 😉) and I set the namespace into which I deployed the operator.
In addition, I’m disabling the toolbox. This is a pod which can be used to
run Ceph commands against the cluster. But I don’t need it, as I’m using the
rook-ceph kubectl plugin, which I will show later.
I’m also disabling monitoring here, as I haven’t deployed Prometheus yet.
Then let’s start with the cluster spec:
cephClusterSpec:
  mgr:
    modules:
      - name: pg_autoscaler
        enabled: true
      - name: devicehealth
        enabled: true
      - name: diskprediction_local
        enabled: true
      - name: rook
        enabled: true
  dashboard:
    ssl: false
  network:
    provider: host
Here I’m enabling a couple of modules. The pg_autoscaler can automatically
scale up and down the placement groups
in the cluster. devicehealth is pretty much what it says on the tin - it
enables gathering SMART data. The diskprediction_local module is a related
tool, which uses the SMART data to make some guesses on how long your disks
still have to live at current usage. Docs can be found here.
Finally, the rook module hooks into Ceph’s orchestrator functionality, but as
I’ve noted above, it doesn’t yet implement all the
functionality of the official cephadm
deployment tool.
I’m also disabling SSL for the dashboard. Simple reason is that it’s not going to be reachable directly from the outside, and all the cluster internal traffic is secured by Cilium’s encrypted WireGuard tunnels.
The network.provider: host config option is important. This config makes it
so that the Ceph daemons use the node’s network, not the k8s cluster network.
So they will be reachable by all hosts in my Homelab subnet, without any routing
and without needing LoadBalancer services or ingresses. This is important for
me, because I don’t just use my Ceph cluster for supplying volumes to k8s services, but also
for other things, like a mounted CephFS on my workstation and the root disks
for my Pis.
Next comes the placements:
  placement:
    all:
      nodeAffinity:
        requiredDuringSchedulingIgnoredDuringExecution:
          nodeSelectorTerms:
            - matchExpressions:
                - key: "homelab/role"
                  operator: In
                  values:
                    - "ceph"
      tolerations:
        - key: "homelab/taint.role"
          operator: "Equal"
          value: "ceph"
          effect: "NoSchedule"
    mon:
      nodeAffinity:
        requiredDuringSchedulingIgnoredDuringExecution:
          nodeSelectorTerms:
            - matchExpressions:
                - key: "homelab/role"
                  operator: In
                  values:
                    - "controller"
      tolerations:
        - effect: NoSchedule
          key: node-role.kubernetes.io/control-plane
          operator: Exists
Nothing too exiting. Worth noting perhaps is that I force my MON daemons to be
put on the controller nodes. This is a similar setup to what I’ve got in my
baremetal/Nomad setup right now as well. The basic thought is to put all the
server components of all of my infrastructure on the same group of three hosts.
In addition, I’m forcing all other Ceph daemons onto the Ceph nodes. That’s just
so I know that as long as those nodes are up, I have a fully functional Ceph
cluster, e.g. for booting all of the other nodes in the cluster, which don’t
have any attached storage.
I’m still not sure how well this idea is really going to work out, and I will
have to do a full cluster shutdown test soonish, to make sure that the Ceph
cluster is able to come up fully and start serving requests without any other
worker node being online.
I’m a bit worried how Kubernetes is going to behave in situations like this. I hope it will just start scheduling the Ceph pods, and then once the Ceph cluster is healthy I will be able to boot the diskless worker nodes.
And now for the storage definitions and dashboard ingress:
  storage:
    useAllNodes: false
    useAllDevices: false
    nodes:
      - name: "node1"
        devices:
          - name: "/dev/disk/by-id/scsi-SQEMU_QEMU_HARDDISK_lxd_cephssd"
            config:
              deviceClass: ssd
          - name: "/dev/disk/by-id/scsi-SQEMU_QEMU_HARDDISK_lxd_cephhdd"
            config:
              deviceClass: hdd
      - name: "node2"
        devices:
          - name: "/dev/disk/by-id/wwn-1234"
            config:
              deviceClass: ssd
          - name: "/dev/disk/by-id/wwn-5678"
            config:
              deviceClass: hdd
ingress:
  dashboard:
    annotations:
      traefik.ingress.kubernetes.io/router.entrypoints: secureweb
    host:
      name: ceph-k8s.mei-home.net
There are two basic options for configuring the storage. First, one can tell
Rook to use all nodes and all devices in those nodes. For me, that’s not what
I want. I’ve got a couple of dedicated Ceph nodes and dedicated storage inside
them. So I’m using the setup shown here. It tells Rook to use the disks on
the two nodes node1 and node2, and only those disks given here.
I’m using the stable names here, instead of /dev/sd*. I’m specifically using
the by-id/wwn numbers for the actual hard disks in my baremetal node to
ensure that I always get the correct disks. These wwn-* numbers are based on
the World Wide Name as provided
by the drives themselves, so they should be completely unique.
For some more details on the different ways of addressing disks, I found
the Arch wiki
pretty useful.
And then there’s also the ingress for the Ceph dashboard. Not much more than defining which entrypoint from my Traefik Ingress it is supposed to use, and under which domain it should be reachable.
One final note: You can do a lot of this setup piecemeal. Even without any nodes in the list, you can already deploy the Helm chart, and then add the nodes to the list as you add them to the k8s cluster. The same is true for the next section, about the cluster pools and storage classes. I deployed the cluster chart first without any pools defined, verified that all the base daemons work and only then added the pools.
Setting up Ceph pools and StorageClasses
In this section, two concepts are combined. The first one are Ceph Pools. These pools are storage pools, logical pieces of your underlying disks. The same disks can be used by multiple pools, the partition is purely logical. Pools are also one of the units which can be used in setting permissions for Ceph auth.
One of the downsides of using Rook is that pools created through Rook cannot be used for different applications. As noted before, Ceph can provide storage in three forms: Block devices, CephFS as a POSIX compatible filesystem and S3 storage. In baremetal Ceph clusters, you can run multiple apps on the same pool. But in Rook, each pool can only be used for one of the three storage applications. Of course you can still create pools manually via the Ceph CLI and assign them to multiple apps. But then you lose one of Rooks biggest advantages: Declarative definition of Ceph.
The second concept are Kubernetes StorageClasses. Those, similar to e.g. IngressClasses, describe a specific form of storage that a user can request for their pod/volume.
I’m using all three storage types Ceph supplies, so I will define pools and storage classes for all of them.
RBDs
Let’s start with the RBD pool(s). RBDs are block devices as per the Linux
definition. They’re raw buckets of bytes and look the same to Linux as your
physical disks. Mounting them, in contrast to e.g. NFS exports, needs an extra
step though. This step is mapping them, which creates the /dev/foo device.
This can then be mounted, formatted with an FS and so on, similar to a normal
disk.
RBDs can be pretty efficient, especially with the exclusive-lock feature
enabled, which allows the client to assume that they will never have to give up
the lock on the RBD volume once acquired, until the device is unmapped again.
For that reason, they’re my default volume. In my Rook setup, I have two pools,
with two different storage classes. One based on my SSDs, and one based on my
HDDs. Most volumes for my services will end up on the HDD pool, with a couple
of exceptions like databases. And yes, I’ve been running a Postgres DB off of a
Ceph RBD volume for almost three years now, without any issues, including
power outages and the like.
Here, I will only show the SSD pool and storage class, as the HDD variant only
has a different name and a different spec.deviceClass.
So here we go:
cephBlockPools:
  - name: rbd-fast
    spec:
      replicated:
        size: 2
      failureDomain: host
      deviceClass: ssd
      parameters:
        min_size: "1"
    storageClass:
      name: rbd-fast
      enabled: true
      isDefault: false
      reclaimPolicy: Retain
      allowVolumeExpansion: true
      volumeBindingMode: "Immediate"
      parameters:
        imageFeatures: "layering,exclusive-lock,object-map,fast-diff"
        csi.storage.k8s.io/fstype: ext4
        csi.storage.k8s.io/provisioner-secret-name: rook-csi-rbd-provisioner
        csi.storage.k8s.io/provisioner-secret-namespace: "{{ .Release.Namespace }}"
        csi.storage.k8s.io/controller-expand-secret-name: rook-csi-rbd-provisioner
        csi.storage.k8s.io/controller-expand-secret-namespace: "{{ .Release.Namespace }}"
        csi.storage.k8s.io/node-stage-secret-name: rook-csi-rbd-node
        csi.storage.k8s.io/node-stage-secret-namespace: "{{ .Release.Namespace }}"
Let’s start with the pool. I’m running all of my pools as replicated pools, with
size “2”. This way I have redundancy, including for whole-host failures via the
failureDomain: host setting. This forces Ceph to store both replicas of an
object on two different hosts. I’m also giving a min_size: "1". This tells
Ceph to continue operating as normal even when one of the two replicas is gone.
That’s a little bit unsafe, but ensures that my systems continue running, even
when the host with the other replica goes down, for maintenance or through
sheer stupidity on my side. 😅
Then there’s the storage class. I’ve got the isDefault option disabled for
all of my storage classes, so that I always have to explicitly chose one. I’m
just wired in such a way that I prefer explicit values to defaults. 🤷
The reclaimPolicy is a very important option. It determines what happens
when a Kubernetes persistent volume
is removed. With the setting Retain, the underlying Ceph volume is retained
and needs to be removed separately. As I’m still a bit unfamiliar with k8s,
I find it prudent to set Retain on all of my storage classes. 😅
Next, the allowVolumeExpansion option does what it says: It allows existing
volumes to be enlarged. The volumeBindingMode option defines when the volume
is created. With the Immediate value, the Ceph volume will be created when
the PVC is deployed in the cluster. With the WaitForFirstCustomer value,
the Ceph volume would only be created once the first pod using it is created.
Then there’s the parameters. Most of them are simply defaults I copied over from
the example values.yaml file. The important one is the imageFeatures setting.
It contains a list of options for newly created Ceph RBDs.
Details on these options can be found here.
CephFS
Next comes the CephFS pool and storage class. CephFS is a POSIX-compliant file system. It can be mounted on any Linux machine and supports permissions and ACLs. It is a bit more complex than RBDs as a consequence, as all the file metadata needs to be handled. For that reason, it needs an additional set of daemons, the MDS (Metadata Server). It allows concurrent access, and that’s what I’m mostly using it for in my setup. I’m using it to share the volume with my Linux ISOs between my Linux ISO media server and my desktop, for example. I’m also using it for cases where multiple Nomad jobs need to access the same volume, RWX volumes in CSI parlance. It will serve the same purpose in my k8s cluster.
As it allows concurrent access and hence suffers from the cost of networked coordination, I’m only having a single pool for it, located on my HDDs, as I don’t expect access to it to need to be fast anyway.
Here’s the definition:
cephFileSystems:
  - name: homelab-fs
    spec:
      metadataPool:
        failureDomain: host
        replicated:
          size: 2
        deviceClass: ssd
        parameters:
          min_size: "1"
      dataPools:
        - failureDomain: host
          replicated:
            size: 2
          deviceClass: hdd
          parameters:
            min_size: "1"
          name: bulk
      preserveFilesystemOnDelete: true
      metadataServer:
        activeCount: 1
        activeStandby: false
        resources:
          requests:
            cpu: "250m"
            memory: "1Gi"
        priorityClassName: system-cluster-critical
        placement:
          nodeAffinity:
            requiredDuringSchedulingIgnoredDuringExecution:
              nodeSelectorTerms:
                - matchExpressions:
                    - key: "homelab/role"
                      operator: In
                      values:
                        - "ceph"
          tolerations:
            - key: "homelab/taint.role"
              operator: "Equal"
              value: "ceph"
              effect: "NoSchedule"
    storageClass:
      name: homelab-fs
      enabled: true
      isDefault: false
      pool: bulk
      reclaimPolicy: Retain
      allowVolumeExpansion: true
      volumeBindingMode: "Immediate"
      parameters:
        csi.storage.k8s.io/fstype: ext4
        csi.storage.k8s.io/provisioner-secret-name: rook-csi-cephfs-provisioner
        csi.storage.k8s.io/provisioner-secret-namespace: "{{ .Release.Namespace }}"
        csi.storage.k8s.io/controller-expand-secret-name: rook-csi-cephfs-provisioner
        csi.storage.k8s.io/controller-expand-secret-namespace: "{{ .Release.Namespace }}"
        csi.storage.k8s.io/node-stage-secret-name: rook-csi-cephfs-node
        csi.storage.k8s.io/node-stage-secret-namespace: "{{ .Release.Namespace }}"
In contrast to RBDs, I’m needing two pools, one for metadata and one for the
actual data. The setup of the two pools is similar to the RBD pool, replication
of “2”, with host as the failure domain. I’m also again setting it up so
that a deletion of the file system CRD does not lead to a deletion of the
file system in Ceph. Just to protect myself from my own stupidity, with the
preserveFilesystemOnDelete option.
I also need to set up the MDS deployment here, which I do the same way as the
other Ceph daemons. Meaning with a toleration of the Ceph taint and an affinity
for my Ceph nodes.
The storage class is pretty much the same as before, with the addition of the
pool option, which denotes the data pool to be used.
RGWs/S3
Finally, S3. I’m using it wherever I need a “data lake” type storage. It doesn’t
have volumes, it doesn’t need to be mounted, I can just push data into it with
a variety of tools until my physical disks are full. I found Ceph’s S3 to be
pretty well supported and have yet to meet any application that wants S3 storage
but won’t work with Ceph. The only thing one might have to do is to make sure
that the path-based option is enabled, as by default, S3 buckets are to be
addressed via DNS, not via a URL.
I’m using S3 for a variety of applications, ranging from Nextcloud to restic
backups.
Similar to CephFS, S3 requires additional daemons, the Rados Gateway (RGW). I have diverted a bit from my current setup here. In my baremetal cluster, Consul agents are running on the Ceph hosts, announcing a service for my S3 storage. Then, the RGWs receive my Let’s Encrypt cert and get accessed directly from the outside, and via the Consul Connect mesh network from services in my Nomad cluster. For now, I decided to keep the RGWs for Rook internal and only accessible through my ingress, to simplify my setup a bit. I will have to see how well that performs, for example during backups.
Here is the definition:
cephObjectStores:
  - name: rgw-bulk
    spec:
      metadataPool:
        failureDomain: host
        replicated:
          size: 2
        deviceClass: ssd
        parameters:
          min_size: "1"
      dataPool:
        failureDomain: host
        replicated:
          size: 2
        deviceClass: hdd
        parameters:
          min_size: "1"
      preservePoolsOnDelete: true
      gateway:
        port: 80
        instances: 2
        hostNetwork: false
        placement:
          nodeAffinity:
            preferredDuringSchedulingIgnoredDuringExecution:
              - weight: 1
                preference:
                  matchExpressions:
                    - key: "homelab/role"
                      operator: In
                      values:
                        - "ceph"
          tolerations:
            - key: "homelab/taint.role"
              operator: "Equal"
              value: "ceph"
              effect: "NoSchedule"
        resources:
          requests:
            cpu: "500m"
            memory: "512Mi"
    storageClass:
      name: rgw-bulk
      enabled: true
      reclaimPolicy: Retain
      volumeBindingMode: "Immediate"
    ingress:
      enabled: true
      annotations:
        traefik.ingress.kubernetes.io/router.entrypoints: secureweb
      host:
        name: s3.example.com
        path: /
First on the agenda is, again, the pool setup. Like CephFS, RGWs need metadata and data pools. They will even create additional pools for indexes and such. Same strategy as before, metadata on SSDs, data on HDDs and replication factor of “2”. And also similar to the other two storage types, I’m preserving pools on deletion, meaning when the pools CRD manifest is removed, the Ceph pool is kept until it is deleted manually.
Then the setup for the RGW daemons themselves. Again, very similar to before. Two instances, and tolerations and affinity for my Ceph nodes to allow them to run there.
The storage class is again nothing special. The ingress is also pretty standard.
Going through my proxy via the HTTPS entrypoint, and being hosted at s3.example.com.
I might add a LoadBalancer service here if I find that I don’t like the perf
of putting all cluster-external S3 traffic through the ingress.
And that’s it. With all of these deployed, the operator will create the necessary pods and pools as well as storage classes, and we’re ready to make use of it. At this point I haven’t actually used the cluster yet, but I just figured that I should provide at least some examples.
So let’s see whether this entire setup actually works. 😅
Examples
If you’ve made it through the 22 minutes of reading time Hugo currently shows, you probably already know how storage in k8s works, so I will be brief. For storage management, k8s has the CSI. A spec on how a workload scheduler will communicate with a storage provider to get volumes. In k8s, the story of a storage volume begins with a persistent volume claim (PVC).
For my specific Ceph Rook setup, that might look like this:
apiVersion: v1
kind: PersistentVolumeClaim
metadata:
  name: test-claim
  namespace: tests
  labels:
    homelab/usage: testing
spec:
  accessModes:
    - ReadWriteOnce
  storageClassName: rbd-fast
  resources:
    requests:
      storage: 2Gi
This will create a persistent volume of size 2 GB, with the rbd-fast class,
meaning Ceph will create the volume on my SSD pool.
This took quite a while to provision, about 7 minutes. I’m pretty sure that’s not normal, but this post is already long enough, so I will investigate that later. 😉
In the end, this produces a persistent volume claim like this:
kubectl get -n tests pvc
AME         STATUS   VOLUME                                     CAPACITY   ACCESS MODES   STORAGECLASS   AGE
test-claim   Bound    pvc-cb5e3aaa-1292-4bbc-9a9e-309be90ee30d   2Gi        RWO            rbd-fast       7m49s
The volume itself can also be shown:
k -n tests get pv
NAME                                       CAPACITY   ACCESS MODES   RECLAIM POLICY   STATUS   CLAIM              STORAGECLASS   REASON   AGE
pvc-cb5e3aaa-1292-4bbc-9a9e-309be90ee30d   2Gi        RWO            Retain           Bound    tests/test-claim   rbd-fast                7m49s
An important piece of information is also shown in the volume’s describe output:
[...]
Source:
    Type:              CSI (a Container Storage Interface (CSI) volume source)
    Driver:            rook-ceph.rbd.csi.ceph.com
    FSType:            ext4
    VolumeHandle:      0001-000c-rook-cluster-0000000000000002-b4e37061-2df1-4a15-8a8d-93f3854cecbb
    ReadOnly:          false
    VolumeAttributes:      clusterID=rook-cluster
                           imageFeatures=layering,exclusive-lock,object-map,fast-diff
                           imageName=csi-vol-b4e37061-2df1-4a15-8a8d-93f3854cecbb
[...]
The interesting thing is the imageName, because that’s the name of the RBD
volume in the Ceph cluster:
kubectl rook-ceph rbd ls --long --pool rbd-fast
NAME                                          SIZE   PARENT  FMT  PROT  LOCK
csi-vol-b4e37061-2df1-4a15-8a8d-93f3854cecbb  2 GiB            2
I will leave it at this for the time being. The CephFS based volume will be pretty similar, and the next thing I will do for the migration is to migrate my S3 buckets over to Rook from the baremetal cluster, so S3 buckets will get their very own article.
kubectl plugin
Before I finish this, I would like to point you to the excellent kubectl plugin
for Rook. It can be found here.
It provides an easy to use interface to the Rook Ceph cluster, without having
to configure admin credentials on the machine you would like to use. The
kubectl certs are enough.
With it, I can access the full ceph CLI, as well as other tools, like rbd.
The main advantage for me is that I won’t have to set up aliases for the two Ceph clusters I’m managing from the same machine. No danger of fat-fingering the wrong cluster. 🎉
Conclusion
Phew. Congrats to the both of us, dear reader, for getting through this. 😅 Overall, I liked the experience of setting up Rook. Especially the aspect that I can now configure at least some aspects of my Ceph cluster declaratively, putting it under version control.
One question I’ve been wondering about: How would this have gone if this Rook setup was my first contact with Ceph? Would it have been equally easy and clear?
I’m honestly not sure. As I’ve noted in the intro, I find my Ceph cluster surprisingly low maintenance, but this setup has again shown me how many moving parts there are. At least from my PoV, Rook does a good job abstracting a lot of that.
But I’m not sure how comfortable I would have been with these abstractions if I hadn’t run a Ceph cluster for almost three years now.
Update on 2024-01-21
A short update on this article: The setup as described here leads to the PG autoscaler not working. If that is something you need, I’ve written a follow-up article with a fix here.